


NOTE: I have rolled the features of pile slides into First Slide.
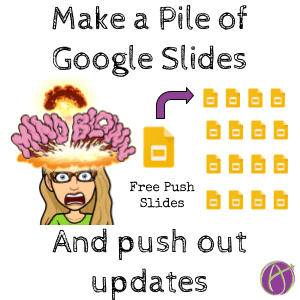
When teaching remotely, or just when teaching with digital tools, using Google Slides is a giant help! Students can create muti-media representations of their work and since Google Slides are collaborative you can see their work in real time. Now you want to be able to update and add to the student slides… my Add-on can help.
- Makes a folder in Google Drive.
- Creates a Google Slides per student on the roster.
- Puts the student name in the slides title and on the first slide.
- Push slides from your Google Slides to each student Slides to update them.
Create a Google Slides per Student
The first problem to overcome is how to create a Google Slides for each student and share it with them. If you are a Google Classroom user this is built right into make an assignment. However, if you are NOT a Google Classroom user this can be a challenge.
Template for Pile of Slides
I have coded an Add-on to allow you to create a blank Google Slides for each student. It puts the student name in the Slides title and adds their name to first slide. The Pile of Slides Add-on also shares the slides with the student. They can find it under “Shared with me” in Google Drive. The whole pile of slides is created in a folder in Google Drive.
Push Slides
This Add-on will allow you to, for free, update student Google Slides. You can push slides from one Google Slides to all of the students slides.
Directions
Create a copy of the template alicekeeler.com/pileofslides You will need to wait a minute or so for the code to load. Look for the Add-on menu to have “Pile of Slides.”
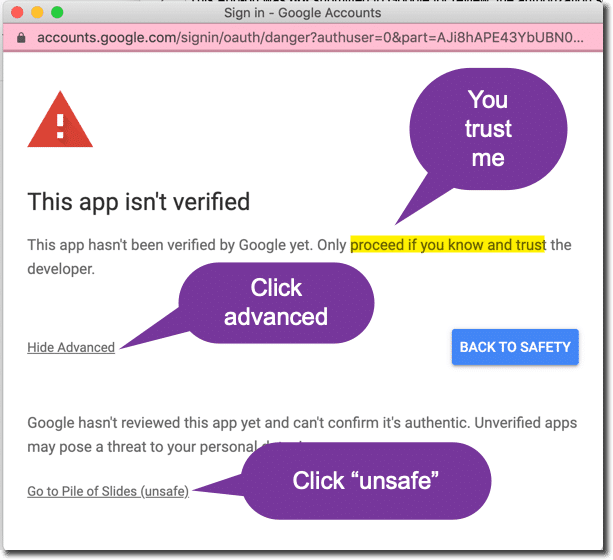
Once the code loads you will need to authorize the Add-on. It might tell you to “Return to safety.” Do not push this. Click on “Advanced” where the pop up is warning you that no one at Google has reviewed the code. This is correct, I did not submit it to Google. Creating a copy of the Add-on puts you as the owner of the code and you are only authorizing YOURSELF to have access to YOUR Drive and files. THIS IS SAFE!!! You might need to click on “unsafe” because Google will verify that it is safe since they never looked at it.
Rename Google Sheets
The spreadsheet title will be “Copy of Make a Folder of Google Slides – Add-on by Alice Keeler.” Rename the spreadsheet. The name of the spreadsheet will be part of the name of the folder created in Google Drive.
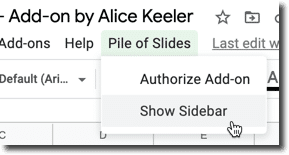
Show Sidebar
Once you have authorized the Add-on choose “Show sidebar.”
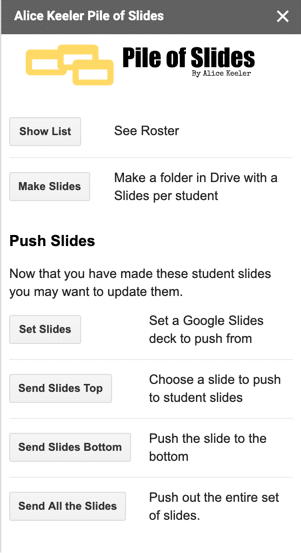
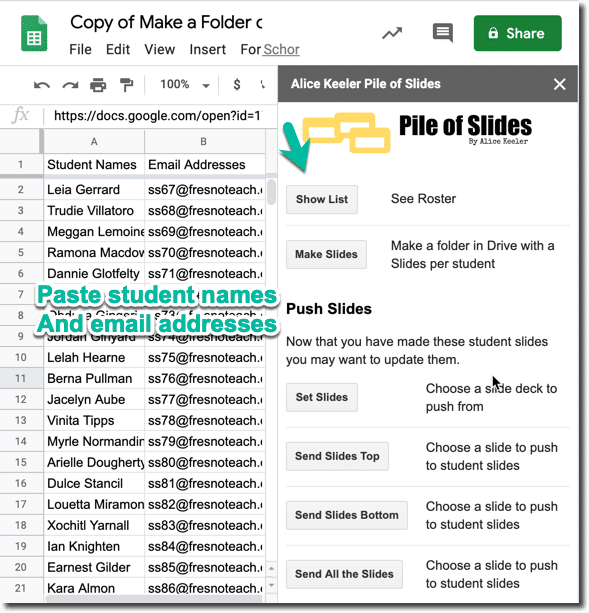
Show List
In the sidebar, click on “Show List” to paste your roster of student names and email addresses.
If your students do not have email addresses this is okay. This is only used to share the Google Slides with the student. If your school is a G Suite for Education school your students have a Google account login that looks like an email address even if they do not have email. You will use this and students can find the slides in their Google Drive under “Shared with me.”
Make Slides
After pasting the roster, click on “Make Slides” in the sidebar. This will create a folder in Google Drive. It will go through the list and create a Google Slides per student in the folder and put each students name on their Slides. It can take a few minutes for the slides to be created and listed on the spreadsheet. It can take an extra few minutes for the student names to appear on the slides.
Push Slides
From a Google Slides you already have you can push a slide to each of the student Google Slides to update the slides.
Set Slides
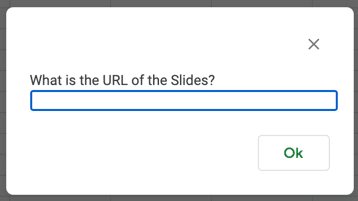
Click “Set Slides” in the sidebar and paste the link to the Google Slides you wish to push from. The Pile of Slides Add-on will remember this url.
Send Slides
Choose one of the 3 options in the sidebar to push slides to the students Google Slides. Choosing “Send Slides Top” will prompt you for which slide you want to push from your Google Slides and send that slide to the top of each students Google Slides. “Send Slides Bottom” will append the selected slide to the bottom.
You can send slides as often as you want the entire school year.
If you want to push the entire set of slides to the student slides, choose “Send All the Slides.”
Reset Slides
If you have a different set of slides you have that you want to push out to the student Google Slides click again on “Set Slides” and set a new Google Slides link.
Google Classroom Users
Instead of alicekeeler.com/pileofslides you want to use alicekeeler.com/reusegc
If the Students Made the Slides
Another way I coded for you to be able to push slides to students is for students to create a Google Slides and submit it to a Google Form. You can then use the Form to push out new slides to update student sides.


15 thoughts on “FREE!! Make a Pile of Google Slides for Students and Update Them”
I have 205 students and when I try to push slides, it will only push to the last 20 before the code stops. Is there a way to fix this? Am I doing something wrong? Do I need to set up 10 different speadsheets with groups of 20?
Hmmm interesting. The code will time out after 30 minutes. But it should do more than 20….
This is amazing and life changing!! Is there a way to add students if you get a new student?
Yes, you can just add a Google Slides TO THE FOLDER. The code automatically looks in the folder for any slides. It will not update the spreadsheet, you would have to do that manually. Copy the link to the slides to update the roster on the spreadsheet if you want.
This is amazing! But I tried to do a mass push of a slide show to my students and about half of them got the slides while the other half didn’t. I tried to relish the slides and then some students had doubles. Is there a way I can fix this? Thanks!
If you pushed a massive amount it may have timed out. Code times out after 5 or 30 min (edu accounts). Suggestion to delete some slides and push only some. Then use version history on your slides to restore. Delete the ones you pushed. Push new ones. Then use version history to restore the whole thing.
If I add a new student to my class and press “Make Slides”, will this affect my other students? Also, is there a way to have students make their own slides and add them to the list I already have generated?
Thanks! This has been an amazing tool!
The has made virtual teaching so much easier! I’ve been successfully using this for a month now and can’t imagine how I managed before! This week I tried to make a new slide deck for our next unit and it stopped creating slides after the very first student. What have I done wrong!?
Most likely there is a shortcut in the folder. Shortcuts are new and my old codes don’t address them being in a folder
Oh I love this. But I am confused. Our students have “email” addresses but don’t actually have an account to access email. Is the link emailed to them? How would they access the slides I just assigned?
From their google drive!!
Hi!!
I absolutely love this and I am trying to integrate it into an Escape Room for my virtual kids. Is there any way I can push a slide to one student at a time when they are ready for it?
One student… Best way is to just copy paste the slide into theirs.
Thank you for all the work on this. It has been very helpful! I used it last year with no issues. This year, when I made the slides, it created a folder for each student. Last year, it organized all the student folders into one. Did I do something wrong this year?
I have moved this feature to First Slide. http://alicekeeler.com/firstslide