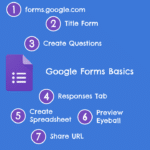
Teachers can use Google Forms as a helpful tool to manage their tasks better. They can use it to give tests, surveys, assignments, and quizzes. It’s easy to customize the form to fit their needs. Teachers can share the form through email or a class website, and the responses are automatically collected and organized into a spreadsheet to make it easy to analyze. To get started, check out this infographic of 7 basic steps for a Google Form.
Get the Infographic: 7 Basic Steps for a Google Form
In today’s digital classroom, mastering the basic steps for a Google Form is essential for educators looking to enhance their teaching methods. Google Forms offers a plethora of features that can revolutionize how teachers interact with students, collect information, and assess learning. However, navigating through these features can be overwhelming for beginners. That’s why this guide focuses on the 7 basic steps for a Google Form that every teacher needs to know. By understanding these fundamentals, you can effortlessly create, manage, and utilize Google Forms to its full potential, paving the way for a more interactive, efficient, and responsive educational environment. Join me as we delve into these basics and discover how they can simplify and transform your teaching experience.
1. Start Your Google Form
Start a new Google Form at forms.new. The form automatically saves to Google Drive. Find your Google Forms, or create a new one from a template, at forms.google.com.
2. Title the Form
You want to title your Google Form. This gets a little tricky. You will notice there are 2 places that indicate “Untitled.”
Form Name in Google Drive
The “Untitled form” in the upper left is the form name that you will see in Google Drive. The students, or those filling out the form, will NOT see the form title. This is how you will recognize the form in your Google Drive.

Start with Form Title
Start with the larger “Untited form” in the form header. This is what the student will see when filling out the Google Form.
Click on Form Name
If you first title the form and then click in the upper left to name the form, the form name will automatically be created from the form title.
In other words, it is less steps.
Then fill out the form description underneath the form title.
3. Create Questions
Google Forms has many question types. Use the floating toolbar on the right side to insert a new question. Use the plus icon, the first icon, in the toolbar to add a new question.

Tip: Ask for Student Last Names
So often I am asked “I forgot to ask for student names, how do I know who filled out the form?” Frankly, you are out of luck. You can not recover what you did not ask for.
Add a separate question for last name.
If you only ask for “name” students will probably just put their first name. If they put their full name, you will be unable to sort by last name… which last name oftentimes how we locate students in the gradebook.
4. Edit the Form Settings
There are a lot of settings for a Google Form that you want to pay attention to. Above the form title are 3 tabs: Questions, Responses, Settings.
Click on the Settings tab to review the form options.
Each section is collapsed. Click on the arrow for each section to expand and read through the choices. I recommend you do this every time you create a form. If you want to turn the form into a quiz you will need to toggle the quiz features. Additionally, I recommend that you ALWAYS collect email addresses. It is too easy to forget to ask for student names and then you have no idea who filled out the form.
5. Link to Google Sheets
One of the best features of Google Forms is that it works with Google Sheets. Go to the Responses tab to click on the Google Sheets icon.

6. Preview the Form
This is really important to understand. There are 2 views of the form: Edit view and Preview.
Obviously while you are editing the Google Form you are in “edit view.” When you open the Form from Google Drive, it should open in “edit view.”
You do not want to share edit view with students.
Google Forms does NOT have a version history (although, check out this option from Martin Hawksey for Forms History). So it can be disastrous if you share the edit version of the form and the collaborator makes unauthorized changes.
Click on the Eyeball Icon
To share the Form with students, or anyone else, you will need the preview link. Click on the eyeball icon in the upper right. You should be looking at what the form looks like when someone is supposed to be filling it out.
Send Button
There is no “Share” button like the other Google Apps. Instead there is a “Send” button in the upper right.
If you want to get the preview, otherwise known as form view, link you can click on the link icon within the pop up.
This link is the SAME url as when you click on the eyeball and preview the form.

7. Find Results in Google Drive
When students fill out the Google Form the results are automatically collected in the Form.
The Google Form is automatically saved to Google Drive.
Go to Google Drive and locate the form name to return to edit view. Student responses are collected on the “Responses” tab.
If you have a spreadsheet for the Form, the responses tab has the link to the spreadsheet. Click on the Sheets icon to launch in a new tab.
Note that responses are COPIED to Google Sheets. If you delete responses from the Google Form it will NOT delete from the spreadsheet, and vice versa. Any edits in the spreadsheet do NOT modify the form data.


