As educators, the introduction of the ability to use the pen in Google Slides marks a significant advancement in interactive teaching methods. This long-awaited feature enhances our capability to engage students in a more dynamic way. Using the pen in Google Slides during presentations allows for real-time annotation, making complex concepts easier to illustrate and understand. It’s a transformative tool that not only brings lessons to life but also fosters a more collaborative and inclusive learning environment. Whether highlighting key information or drawing connections between ideas, this feature significantly enriches the educational experience for both teachers and students.

5 Key Things to Know About Using the Pen in Google Slides
The long-awaited feature in Google Slides is finally here – the ability to annotate during presentations. Excitingly, using the pen in Google Slides has now become a reality! This enhancement opens up a new realm of interactivity and engagement for both presenters and audiences. Here are 5 key things to know about this feature:
1. The Pen Only Works in Presentation View
There is still NO good drawing pen directly in Google Slides.
When I use presentations in Canva I frequently use the draw tool, and it is pretty robust. Strangely, Google Slides has not gotten the clue yet that this is a highly valued feature.
So it is important to understand that this pen feature is only when you click on “Slideshow” and are actually presenting the Google Slides.
The text DOES remain throughout the presentation. If you go back to a previous slide, the ink annotations will still be visible.
3. Keyboard Shortcut is Shift L
To quickly enable the Pen tool use Shift L. This will also allow you to stop annotating. While in Pen mode you can not click on the slide to advance, obviously. Use Shift L to quickly toggle the Pen tool on and off.
Utilize the arrow keys while using the pen in Google Slides to advance slides.
4. You Can Change the Color

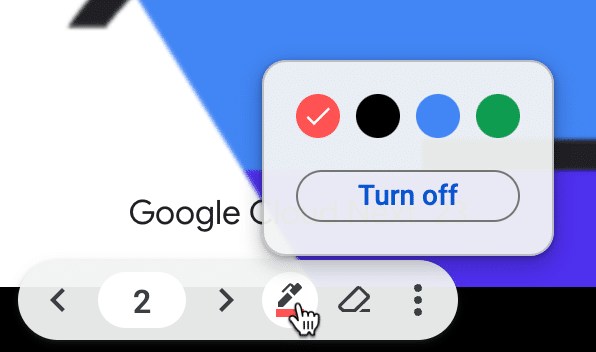
There are 4 pen color options. The default is red. Hover in the bottom left corner of your presentation to see the Slides toolbar. If the Pen tool is enabled you will see the pen icon next to the slide number. Click on this to change the pen color.
5. All or Nothing
Using the pen in Google Slides also requires erasing sometimes. Note the eraser icon next to the pen icon.
When using the eraser tool, it erases ALL of the ink annotations on the slide. Note that it is ONLY that slide and not all of the slides that the ink annotations are erased.
Use Shift A to erase annotations
Limitations of Using the Pen in Google Slides
In wrapping up, it’s clear that using the pen in Google Slides, while not groundbreaking, provides a functional tool for educators and presenters seeking basic annotation capabilities. Despite its limitations, such as the lack of a sophisticated drawing pen and the eraser tool’s restriction to individual slides, using the pen in Google Slides offers a straightforward way to enhance presentations. It aids in highlighting key points and engaging audiences, albeit within its scope. As users of Google Slides, understanding and utilizing this feature effectively can still add a layer of interaction to our presentations. Ultimately, while using the pen in Google Slides may not be an innovation in the fullest sense, it is a useful step towards more interactive and engaging presentations.


