As teachers increasingly transition to digital learning environments, Google Drive has become an essential tool for organizing resources, collaborating with colleagues, and delivering content to students. While Google Docs is the go-to for many educators, there are times when a Word document might enter the mix. This could be a resource from past lessons, something shared by a colleague, materials provided by a publisher, or even something downloaded from the internet. Understanding how to manage Word documents in Google Drive, whether to keep them as Word files or convert them to Google Docs, can help streamline teaching workflows.
Why Teachers Might Have Word Documents
Even if Google Docs is the primary tool, many teachers encounter Word documents for several reasons:
- Past Resources: You might have lesson plans, worksheets, or assessments from years ago stored in Word format.
- Shared by Colleagues: Collaborations with colleagues often involve exchanging documents, and some of those may be in Word format, especially if others in your team still rely on Microsoft Office.
- Publisher Materials: Many educational publishers provide digital resources in Word format. This allows for easy customization, but it means you’ll need to manage Word files effectively.
- Internet Resources: Teachers often find free resources, templates, or activity sheets online, many of which are provided as Word files.
Why Save Word Documents to Google Drive?
When teachers are handed Word documents, saving them to Google Drive provides several advantages:
- Centralized Storage: Google Drive allows you to keep all your documents in one place, easily accessible from any device.
- Backup and Security: Documents saved to Google Drive are stored in the cloud, which ensures they’re backed up and protected from local computer crashes or hardware failures.
- Easy Sharing: Word files saved in Google Drive can be easily shared with colleagues, administrators, or students, even if they don’t use Google Docs or Word.
- Version Control: Google Drive tracks versions, so you can always return to earlier versions of your Word document or Google Doc if needed.


Once your Word file is uploaded to Google Drive, you have the flexibility to decide how to manage it. Should you keep it as a Word document or convert it to Google Docs? Let’s explore the pros and cons of both options and how to decide which works best.
Managing Word Documents in Google Drive
After uploading a Word document to Google Drive, you have two primary options for working with it:
Option 1: Keep the File as a Word Document
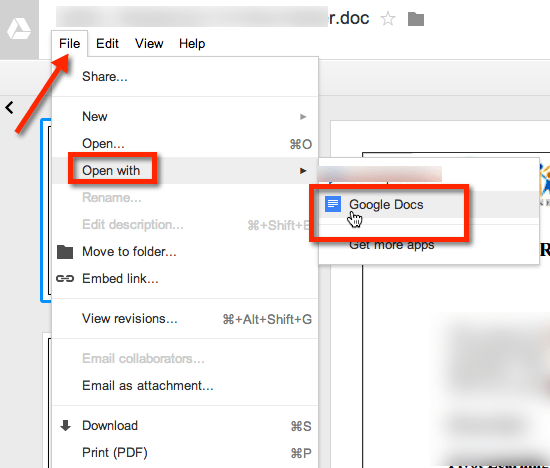
When you upload a Word document to Google Drive, it remains a .docx file. You can open it in Google Docs and make edits, but the file retains its Word format. This is helpful if you need to maintain the original formatting or plan to send the document back to someone who prefers using Word.
Why Keep the File as Word:
- Preserving Complex Formatting: Some Word documents, especially those from publishers or that include tables, charts, and specific fonts, may not convert well to Google Docs. By keeping it in Word, you ensure that formatting stays intact.
- Collaborating with Word Users: If you’re working with colleagues who primarily use Microsoft Word, it may be easier to keep the file in its original format. This way, you avoid any formatting discrepancies when sharing the document back and forth.
- Minimal Changes to Original Content: If the document is a provided resource (e.g., a publisher-provided curriculum or a pre-made worksheet), and you don’t plan to make substantial edits, keeping it in Word preserves the content as intended by the original creator.
Doc to Slides
Quickly turn your Google Doc text into Google Slides
Created by AliceKeeler – Collects NO user data.
Drawbacks of Keeping the File as Word:
- Limited Access to Google Docs Features: Google Drive lets you open Word files, but certain features like add-ons, real-time collaboration, and advanced Google Classroom integrations aren’t fully available unless the file is converted to Google Docs.
- Potential Collaboration Hiccups: While you can edit a Word file in Google Drive, multiple people editing it simultaneously can cause issues. If you’re looking for smooth, real-time collaboration, this might not be ideal.
Option 2: Convert the File to Google Docs
The other option is to convert the Word document into Google Docs format. Once uploaded, you can open the document in Google Docs and choose “Save as Google Docs,” creating a separate Google Docs version while keeping the original Word file intact. This unlocks all the features Google Docs has to offer.

Why Convert to Google Docs:
- Enhanced Collaboration: If you plan to collaborate with colleagues, converting the file to Google Docs allows for simultaneous, real-time editing. You can also add comments, tag collaborators for feedback, and track changes effortlessly.
- Google Classroom Integration: For teachers using Google Classroom, converting Word documents to Google Docs makes it easier to assign tasks, provide feedback, and monitor student submissions. Google Docs files integrate seamlessly with Classroom assignments.
- Autosave and Version Control: Google Docs automatically saves your work as you go, ensuring no changes are lost. Additionally, you can access version history to see previous edits, who made changes, and revert to an earlier version if needed.
- Integration with Add-Ons: Once the document is converted to Google Docs, you can use various add-ons like grammar checkers, citation managers, and formatting tools to enhance the content. This gives you more flexibility in customizing or improving a document compared to the limited editing features of a Word file in Google Drive.
Drawbacks of Converting to Google Docs:
- Potential Formatting Loss: Word documents with complex formatting, such as advanced tables, footnotes, or special fonts, may lose some of that formatting when converted to Google Docs. Teachers might need to spend extra time fixing these issues post-conversion.
- File Size Limitations: Although this is less common, Google Docs has a file size limit of 50 MB for documents. Large Word files with many embedded images or charts may not convert smoothly or could hit this limit.
Setting Google Drive to Automatically Convert Word Documents
If you’re a teacher who frequently receives or works with Word documents but prefers to use Google Docs for its collaborative and cloud-based features, you can adjust Google Drive settings to automatically convert Word files upon upload. This eliminates the need to manually convert each document and ensures all files are available in Google format right away.

Here’s how to set your Google Drive to automatically convert Word documents (and other Microsoft Office files like Excel and PowerPoint) to Google Docs, Sheets, or Slides:
How to Enable Automatic Conversion
Access Google Drive Settings:
- In Google Drive, click on the gear icon in the top right corner.
- Select Settings from the dropdown menu.
Enable Conversion:
- In the settings window, look for the Uploads section.
- Check the box that says Convert uploads to Google Docs editor format (as shown in the image).
Save Settings:
- After checking the box, close the settings window, and from now on, any Word documents you upload will automatically be converted to Google Docs format.
Why Use Automatic Conversion?
Streamlined Workflow: If you are sure that you won’t need the original Word format, automatic conversion saves time. Every file uploaded becomes a Google Doc (or Sheet, Slide, depending on the type), meaning you can instantly start collaborating, commenting, and editing.
Full Access to Google Docs Features: Converting to Google Docs format allows you to leverage all of Google’s features, including real-time collaboration, version history, and Google Classroom integration.
No Manual Conversions: By enabling this setting, you avoid having to manually convert each document one at a time, saving effort when working with multiple files.
Things to Consider
Original Word Documents Won’t Be Saved: Once converted, the original Word format won’t be preserved unless you manually choose to upload the Word file again without conversion. This is great if you don’t need the Word version, but if you want to keep the original format for any reason, you’ll need to disable this setting or upload the Word file separately.
Formatting Adjustments: In some cases, complex Word documents may experience formatting changes during conversion. If formatting preservation is important for certain documents, you may want to manually convert them and review any adjustments needed.
This feature is ideal for teachers who have made the switch to Google tools and are looking for an efficient way to manage incoming Word documents from publishers, colleagues, or the internet without the hassle of individual conversions. By setting up automatic conversion, you can focus on using Google’s powerful collaboration tools without worrying about file compatibility.
How to Choose: Keep as Word or Convert to Google Docs?
Teachers need to evaluate how they’ll be using the document to determine the best option. Here are some questions to guide the decision:
- Do You Need to Preserve Formatting? If the document includes complex formatting (tables, charts, custom fonts) or is a ready-to-use resource from a publisher, keeping it as a Word file might be best.
- Are You Collaborating with Others? If you’re working closely with colleagues or students, converting the document to Google Docs makes collaboration easier. Google Docs allows for real-time editing, commenting, and version history.
- Is the Document Going to Be Distributed via Google Classroom? If you’re assigning the document to students in Google Classroom, converting to Google Docs ensures smoother integration and better access for students using Google’s suite of tools.
- Are You Just Storing It? If the Word file is a resource you’re simply saving for reference and don’t need to edit, leaving it as a Word file in Google Drive is an efficient way to store it without altering the original content.
Best Practices for Managing Word Documents in Google Drive
Whether you choose to keep your Word documents as is or convert them to Google Docs, here are a few best practices for managing these files in Google Drive:
Use Folders for Organization: Create folders in Google Drive to keep your Word and Google Docs files organized. Consider sorting by subject, year, or unit to make resources easy to find.
Make a Backup Before Converting: If you’re converting a Word document to Google Docs, it’s a good idea to keep the original Word file in case you need to revert to it. Google Drive will save both versions separately.
Check Formatting After Conversion: If you do convert the document to Google Docs, review the formatting to ensure nothing was lost or altered in the process, especially for materials that students will use.
Share with Specific Permissions: When sharing a Word document in Google Drive, you can adjust permissions so that the recipient can either view, comment, or edit the file. Use “Can comment” or “Can view” options if you don’t want others making direct changes to the document.
Tag Collaborators: If you’re working in Google Docs, use the comment feature to tag colleagues or students (by typing “@” followed by their email address) when you need feedback or edits. This keeps collaboration organized and transparent.
Conclusion
Managing Word documents in Google Drive provides teachers with flexibility and convenience, whether dealing with old resources, new materials from publishers, or shared files from colleagues. Deciding whether to keep a document in Word format or convert it to Google Docs depends on your needs for collaboration, formatting preservation, and integration with tools like Google Classroom. By understanding these options, teachers can make the best decisions for organizing, editing, and sharing their resources, all while taking full advantage of the powerful features Google Drive and Google Docs offer.
Original Blog Post