I like to use www.quia.com for my mastery learning. I have hesitated wanting to teach Geometry because I like to do all my stuff digitally and the thought of making all those graphics was overwhelming….
Well, I am teaching Geometry this year. And creating all of those graphics IS overwhelming. But I’ve figured out a way to make them relatively quickly.
Step 1: create a Google Doc
Step 2: I named my document Geometry Drawings 1 and made it public.
Step 3: Insert->Drawing
Step 4: repeat inserting drawings several times. This gives you a bunch of graphics on one document.
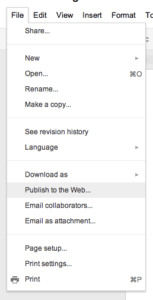
Step 5: Go to file->Publish to the Web
This creates a webpage rather than a Google Doc of your document.

Step 6: Go to the published page
Step 7: Right click on the image and copy the Image URL.
Step 8: Use that image URL where you need images. I use a little html code in www.quia.com/web when creating my activities to insert the images.
Sample: http://www.quia.com/rr/846533.html
Note: To learn a little html do a Google Search for “HTML for teachers” the first link that comes up is an excellent tutorial by Maricopa County. http://www.mcli.dist.maricopa.edu/tut/
The HTML code for inserting images is <img src=”url”>
I have a group Quia account to get discount pricing. I lose money on this, but like to encourage teachers to use Quia. Contact me if you are interested.


