


If you use Google Forms for formative assessment quizzes here are some tips for the Form and the linked spreadsheet. Go to forms.google.com and create a Quiz. You can also turn on Quiz capabilities in the Settings tab of your Form.
Responses Tab
One of the best ways to view student responses is by using the Responses tab in Google Forms. A Google Sheets spreadsheet is NOT created automatically for your Google Form. Click on the green spreadsheet icon to create the spreadsheet. Do this for EVERY Google Forms Quiz.

Quiz Helper by Schoolytics
I had originally written this blog post in 2014. I am updating the post to reflect the current design of Google Forms. I took many of my tips from this post and used it to design Quiz Helper by Schoolytics.
Tip: If you are using Google Forms for Quizzes I have coded an Add-on to help you with all the settings. INCLUDING creating the Google Sheets spreadsheet for the Form. Install Quiz Helper by Schoolytics and use the puzzle piece icon at the top to show the sidebar and set Form defaults. Many of the tips in my post are done automatically by this Add-on.

Free for teachers. Collects NO User Data.
Coded by Alice Keeler
1. Collect Email Address
It is important that you collect the student’s email address. This is how you will release feedback to the student. Without their email address, it will be challenging. Quiz Helper by Schoolytics will enable collecting email addresses so you do not forget, but I highly recommend that you go to the Settings tab of any Google Form and scroll to the bottom. Under Defaults toggle on “Collect email addresses by default.” This will guarantee you collect email addresses in all FUTURE Forms. Your past ones, you still need to enable the feature.

Want More Help with This? Become a Premium Member
2. First Name
Rather than ask for “name” make 2 questions. One for “First Name” and one for “Last Name.” This way you can easily sort the linked spreadsheet by either first or last name. This is also very handy when putting the results in the gradebook. Be sure to make the question worth zero points and REQUIRED!
Tip: Quiz Helper by Schoolytics will add these 2 questions for you, make them required, and set them to zero points.

If you teach High School you may want to add a question “What period are you in?” Make this multiple choice.
3. View Responses
There are 3 tabs in your Google Form. Click on “Responses” to see how your students performed and to give feedback in the Form.

There are 3 tabs under Responses.

First view the Summary to see how your students did overall. This is a huge advantage when using Google Forms over paper. Seeing at a glance how students did on individual questions helps you to form what you do after the quiz.
To give feedback and adjust the points on the questions click on “Question” or “Individual.” You can review responses by question or you can review them student by student.
Tip: If you give feedback in Google Forms use Quiz Helper by Schoolytics to create a Google Doc for each students with a report of their performance and the feedback you left them.
4. Turn OFF Accepting Responses
If you do not want students to take the Quiz, click on the toggle on the Responses tab for “Accepting responses.”
Tip: Quiz Helper by Schoolytics has an option to set a timer where the Form will automatically stop accepting responses after the timer expires.
5. Answer Key
Before the students take the Quiz, YOU TAKE IT! Instead of using your name use “ANSWER” for the first name and “KEY” for the last name. Fill out the Form with the correct answers. This does NOT set your answer key in the Form. It simply makes it easier when viewing the responses in the spreadsheet.

6. Freeze Bar
By default the first row of the spreadsheet is frozen. This allows you to scroll through all of the student answers and still see the questions. If you were the first person to answer the Google Form quiz and you used “Answer Key” for the name, then the second row contains the answers.
On the left hand side, between rows 1 and 2, hover over the freeze bar. You will notice the cursor turns into a hand. Click down on the freeze bar and drag it down to freeze the first 2 rows. This will freeze the answer key at the top of the spreadsheet. As you scroll through the student answers you can compare their answer to the answer key easily.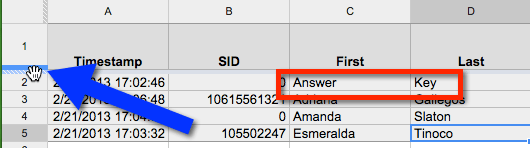

7. Sort
Hovering over the column indicators will reveal a small drop-down arrow. Click on this to choose to sort the sheet. You can sort the results by Last Name, Period, etc…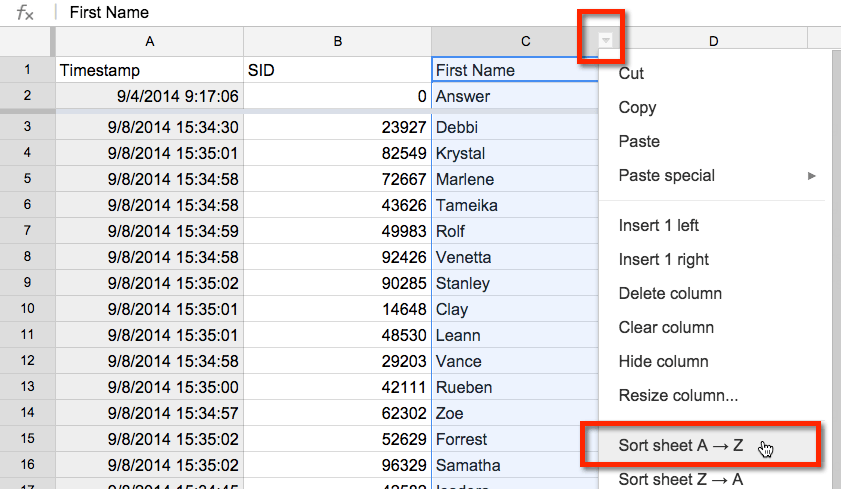
Sort each question. This will allow you to cluster which students answered what. Since the results of a Google Form are instantly in the spreadsheet as students submit you are able to quickly identify which students answered each answer choice for a particular question. Divide up the students by who answered what to provide a differentiated activity.
8. Multi – Column Sort
You probably want to sort by multiple columns. Such as by Period, Last Name and then First Name. Click on the select all square to the left of the column indicator A and above the row indicator 1. This should select the entire spreadsheet. Use the Data menu and choose “Sort range.” Under this select “Advanced range sorting options.”

Be sure to checkbox the “Data has header row.” Then choose the questions you want to sort by.

9. Conditional Formatting
Conditional formatting allows you to color code the cells based on the answer. For example, if the student puts down the correct answer the cell background color will be green. If a score is less than 70% you can have the background color be red. This allows you to easily identify trouble areas and find selected answers quickly.
Click on the column indicator of a question to highlight the entire column. Right-click on the column indicator and choose “Conditional formatting.”

This will open a sidebar for you to indicate the correct answers.
There are a variety of ways you can test the data with conditional formatting. If you have an exact answer you are looking for choose “Text is exactly” from the drop down menu. If you are testing numbers you may want to choose something like “Greater than.”

Example of Conditional Formatting


