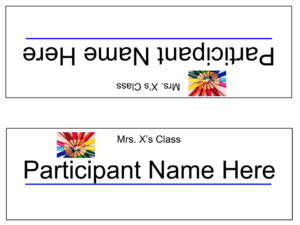
I love Google Drawing. Many people do not even realize it is part of the Google Doc’s options. When I am teaching and introducing students to Google Drive and Google Docs I use Google Draw as my first activity. I create a template in Google Draw for a name sign. I then have students make a copy and share it with me.
First thing the name plate activity does for me is helps me to learn my students names. I have them put their name sign up on their desk. The second thing it does it right off the bat shows the students the magic of Google Docs. They simply type their name and then the next day I show up with their sign printed. Effortless submission, helps to win them over!
Create a Template
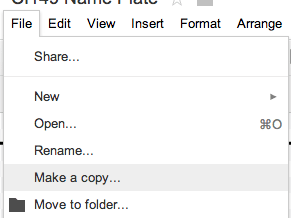
Click Here to access my template. You can use File->Make a Copy to make your own copy. Edit the template to have your class name at the top. You can also customize the picture.
Share
Make sure you click on the blue share button and change the sharing to “anyone with the link can view.” Share the link with students.
Name it and Share it
When using Google Docs I always teach that the first thing you do is “Name it and Share it” before you type a single thing. Have the students click on the title and rename it with your class naming nomenclature.
Students should then click on the blue share button and type in your email address. I overly emphasize to have them UNCHECK the notify via email checkbox. As a high school and college instructor I have a lot of students, my inbox does not need to explode over an assignment I am expecting.
Type in Your Name
A personal pet peeve of mine is when I see people using the delete key. I try to take this opportunity to teach students they can double click on a word to highlight the word or triple click to highlight the phrase. I try to get them to triple click on “Participant Name Here” and to NOT hit the delete key, but instead to just start typing. Anyway, they should type their name on both sides of the name sign.
Control W
Just to really freak them out, I tell them to next use Control W. (Command W on a Mac). Learning keyboard shortcuts is a big step towards making students computer ninjas so any chance I get to teach them a shortcut I will.
Pull Up Google Drive
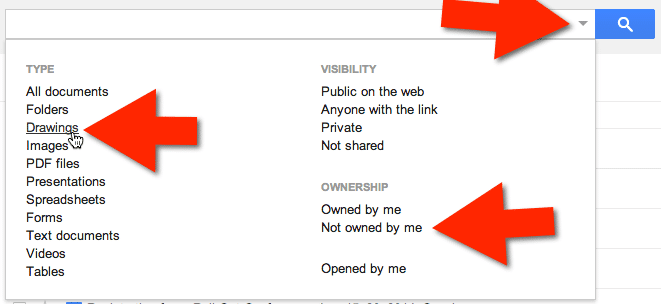
I then pull up my Google Drive. Up in the search box at the top is the ability to filter Google Drive. I choose to filter for Google Drawings that are NOT owned by me. I then type the “After:yyyy-mm-dd.” And this should show me all of my students drawings. Note that the AFTER is not inclusive. So if students made their drawings on the 20th you would want drawings after the 19th.
I want students to see that I have their drawings even though they did not print it out or do anything special to share it with me. I think the visual of them seeing everyones name sign in my Google Drive is pretty magical.
I wish there was an option to print multiple things at once, but there is not. Here is my workflow.
I filter all of the drawings as I did above. I drag them into a folder I created called name signs.
I click on the star so I know I printed it.
I click on the title of the document to open it.
I use Control P to print.
I push enter.
I use Control W to close the drawing.
Repeat.
I also take the time if a student did not rename the document to go to File->Email Collaborators and remind the student how to name documents for my class.
Bring Signs
The next day I come in with a big armful of name signs.


