Teacher Tech blog with Alice Keeler

Paperless Is Not a Pedagogy

Alice Keeler

Google Sheets: Split and Transpose

Split and transpose are spreadsheet formulas with a lot of practical use for teachers. Use this tutorial for how to build a rubric.
google sheets split and transpose
Google Sheets: Split and Transpose

Teachers, ever feel like your data in Google Sheets is trapped in rows and columns like students stuck in their desks? Well, break free the data and unleash its potential with the magic of “Split and Transpose”! Imagine this: you have a row bursting with student names and their corresponding test scores, separated by commas. With a simple formula, you can split each name and score into separate rows, creating a neat, tidy table perfect for analysis. Or, picture a column overflowing with categories and their associated prices. Transpose that column, and voilà! You’ve got a clear, horizontal list of prices ready for comparison. “Split and Transpose” is a game-changer, streamlining your data, unlocking new insights, and making your spreadsheets sing. So, ditch the rigid rows and columns, and let your data dance with this powerful technique!

Learn More about Google Sheets from Teacher Tech

Split and Transpose in Google Sheets

This Google Sheets trick helps you to extract lines of text out of a single cell and have the text in individual cells.

Split:
  • Divide and conquer long, combined text like “JohnSmith” into “John” and “Smith.”
  • Untangle lists hidden within cells, separating elements by commas or other delimiters.
  • Extract individual pieces of information from complex strings, like dates, times, or codes.
  • Turn a single row of data into multiple rows, each holding a specific component.
  • Rearrange data to fit your needs, creating tailored analyses and reports.
Transpose:
  • Swap rows and columns, transforming vertical data into horizontal and vice versa.
  • Put related information on equal footing for easy analysis and spotting trends.
  • Prepare data in the perfect format for stunning charts and graphs.
  • Escape the tyranny of vertical lists and unleash data for creative explorations.
  • Design engaging activities where students manipulate data through transposing.

Table of Contents

5 Reasons Teachers Would Use Split and Transpose

  1. Transform messy data into manageable magic: Splitting long rows of information (like names and scores) into separate rows or transposing columns into rows cleans up cluttered spreadsheets, making data analysis a breeze. Imagine a clear table instead of a comma-infested jungle!

  2. Unleash hidden insights with flexible formatting: Transposing data lets you compare related information side-by-side, revealing patterns and trends that might be invisible in its original format. It’s like turning your spreadsheet into a data detective, sniffing out hidden connections!

  3. Simplify grading and feedback: Splitting student responses into individual rows makes grading faster and more efficient. Imagine easily spotting common mistakes or standout performances – no more scrolling through endless responses!

  4. Craft custom reports and charts with ease: Transposed data is the perfect format for creating visually appealing reports and charts. No more data wrangling – just drag and drop your transformed data onto charts and graphs to tell your story with impact.

  5. Boost student engagement with interactive activities: Split and transpose functions can be used to create interactive exercises for students. Imagine splitting a list of historical figures into categories and having students match them – turn data manipulation into a fun learning experience!

How to Use Split and Transpose

Here is an example of using the spreadsheet formulas to create a rubric.

Use Split and Transpose in a Rubric

Where I was doing this was using a rubric. Multiple criteria were entered into a single cell, but this made it difficult to mark each of the items in the list. Click Here if you would like to try out this sample spreadsheet.
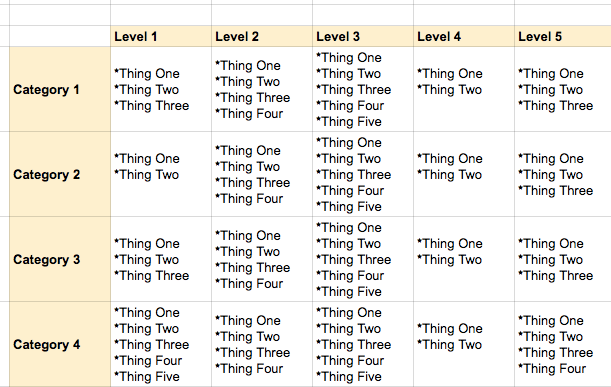
sample rubric

Carriage Return

To get text on different lines within the same cell use Control Enter (Command Enter on a Mac).

Split

=Split() will split up text at a given delineator. This does assume there is something you can identify that splits up the text. In the case of my sample rubric the asterisk (*) was what I could use to split up the text.
split text from rubric

This splits up the text horizontally but I need my text to be vertical.

Transpose

=Transpose() flips a range of cells from vertical to horizontal (or vice versa.). Type =transpose( into a blank cell and highlight the range of cells you wish to transpose.
transpose

The combination of =split() and =transpose helps me to get extract the lines of text and put them into individual cells. The problem with this is I am unable to drag the formula to the right to arrange split and transpose the entire category.

Nest the Formulas

=transpose(split(C4,”*”)) will do both actions at once.
transpose and split

Since the transpose separates the lines within the cell into individual cells you will only be able to do this one category at a time. Repeat the nested transpose and split formula for each category.

Trim

Another formula I needed to use was =trim() to trim the carriage return at the end of each sentence.

© 2024 All Rights Reserved.

💥 FREE OTIS WORKSHOP

Join Alice Keeler, Thursday Mar 21st or register to gain access to the recording.
Create a free OTIS account.

Join Alice Keeler for this session as we learn how to revolutionize your assessment strategies. We will dive into the essentials of crafting high-quality rubrics that go beyond traditional scoring methods to offer rich, meaningful feedback. We’ll learn about the components of an effective rubric and how to mathematically ensure the accuracy of your assessments.

Exit this pop up by pressing escape or clicking anywhere off the pop up.