Gamification is one way to motivate students. There is no one way to gamify your class but an easy way to get started is to provide students choice. Try a choice board to help give students a locus of control, make a decision, and have fun learning! This gamified choice board now adds game designer for badge game.

Badge Game
Badge Game is a project I have been working on for many years. What started as a simple spreadsheet to reveal badges has now grown with the addition of Game Designer.
Badge Game Template
Create a copy of the Google Sheets template.
Table of Contents
Steps for Getting Started with Game Designer for Badge Game
Lorem ipsum dolor sit amet, consectetur adipiscing elit. Ut elit tellus, luctus nec ullamcorper mattis, pulvinar dapibus leo.
Name the Game
After making a copy of the template, rename the spreadsheet to the name of your game. Click on the upper left of the sheets to change the document name.
Game Designer
This is optional! Notice next to the help menu that it says “Game Designer.” This provides you a menu of options for ways to manage your choice board. This is an unauthorized Add-on, I have not submitted it to Google for approval so you will get a warning that Google has not reviewed the Add-on. You may need to click on “Advanced” and “unsafe” (it is safe, I coded it personally).

Color Changer
Each time I create a choice board I like it to have different colors so I can distinguish them apart. Use the Color Changer option to randomize the colors in the choice board.
Choice
What makes this a game is that the students have CHOICE. Include some fun options on the choice board in addition to required activities and some challenges. There should be more quests (activities) than are required.
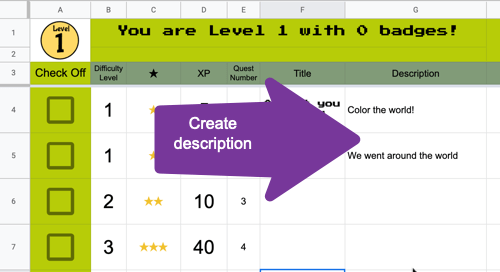
Start with Description
You want your first couple of quests (activities) to be wicked easy. Success builds success! In column G you will write the description of what the students will do for the quest. My tip is to go through and make your descriptions first. Your list of activities.

Difficulty Level
After creating a list of choices, put a number into column B to indicate how challenging the quest is. The number of stars in column C will automatically populate.
XP – Game Points
The XP column stands for “Experience Points.” These are the game points not the assignment points. I usually will make the entire choice board ONE assignment. I tell them they need to reach a particular level and they can choose which quests they want to do to make that happen. The XP simply helps with the level up so assign as much XP as you want. Generally I make XP proportional to the difficulty of the activity, but not always. If I am really hoping a student will do a particular choice I will just make it more XP.
Titles
Try to have fun and come up with quest titles that are interesting! I typically will make the quest titles LAST.
Link
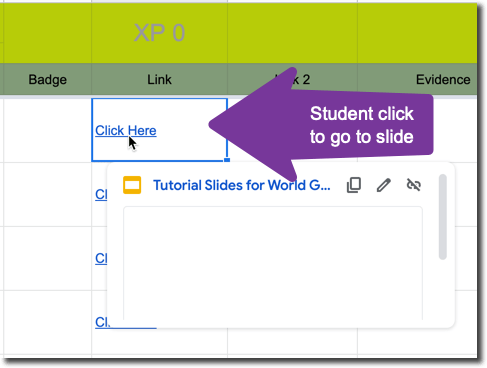
In column I is an option for a “Link.” I will link to a resource with additional directions or instruction. Use the Game Designer menu at the top to “Create Slides Tutorials.” This will automatically generate a Google Slides along with hyperlinks to the Slides in the spreadsheet. Use the same ONE Google Slides for all of your tutorials/directions. When students click on “Click Here” for the link it will give them the option to open the Google Slides, directly to the slide for that quest.

Badges
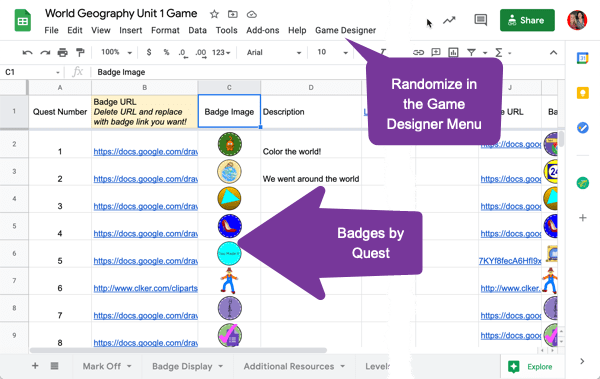
Use the “Badges” tab at the bottom to decide which badge goes with which quest. Use the “Game Designer” menu at the top to “Randomize Badges” if you want to change up the default badges.

Badge Library
The badge images are generated by an IMAGE LINK. The image link in column B is what creates the image for the badge game. Delete the IMAGE LINK in column B if you do not want to use the default badge. In column J is a list of alternative badges you can choose from. Copy the Image link from Column J into column B.
Make Your Own Badges
If you want different badges than those in the Badge Library, create a Google Drawings and use the File menu to choose “Publish to the web.” This published link can be pasted into column B of the Badges tab.
Use the “Game Designer” menu to automatically generate 10 Google Drawings to get started. You will need to use the File menu on each one and “Publish to the web.” Copy the published link into column B of the Badges tab in the spreadsheet.
Levels
On the “Levels” tab determine how much XP a student should earn to get to the next level. I highly recommend that any one quest automatically results in leveling up to level 2. Make it easy at first to level up and then gradually gets more difficult to level up.
Share with Students
You can use this spreadsheet to share with students, make a copy for each student. However, if you use the Game Designer menu there is the option to “Create Student Version.” This will create a new spreadsheet that uses the spreadsheet formula =importrange() to allow you to make updates to the quest list and have student copies update.
Use the “Create Student Version” to allow you to update typos or add new quests.
Make a Copy Per Student
This is intended to be a copy per student. Each student individually checks the checkboxes in column A of the quests they have completed. If using the “Create Student Version” this is the spreadsheet you want to provide a copy of for each student.


