One reason a parent might not read the classroom newsletter is that it is not about their child. Here is a solution for creating weekly newsletters for parents that are individualized for their child.
Newsletter Templates
Add the above Google Drive folder of newsletters to your Google Drive. You can make copies and use these templates for your classroom newsletter.
The Newsletter Design
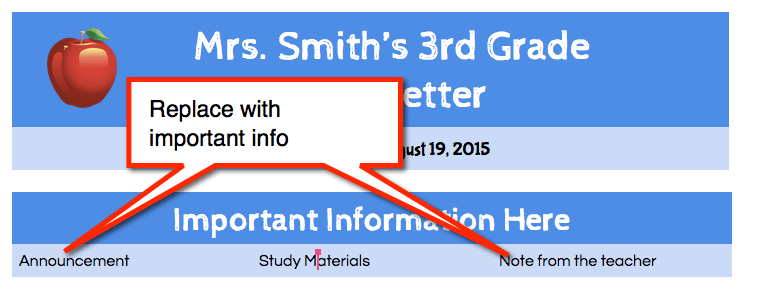
The design of the newsletter allows you to put the really really important information at the top of the newsletter.
About “Joe”
Underneath the most essential information to include in the newsletter is a section that is customized to each child. It is good practice for teachers to each week individually consider each student in their class. What the students are good at and what they are needing to work on should influence lesson design. I always recommend that teachers have a spreadsheet with a roster of their students and to go through and make a note why each student would be engaged in that lesson.
In a spreadsheet have a roster of the students, the students email address, the parents email address and 3 additional columns. A column for a quick note to the parent about the child. A quick note of what the child has demonstrated they learned that week. A quick note of what goals the child is working on.
Merge Tags
The newsletter has merge tags as a part of the newsletter design. A merge tag is a placeholder that will be replaced with the note from the spreadsheet. You can add the merge tags to additional places within the document.

When composing the additional pieces to the newsletter try to use the <<name>> merge tag as often as possible. Instead of saying “Students will need to bring a lunch from home for the field trip on Friday” try “<<name>> will need to bring a lunch from home for the field trip on Friday.”
Wish List
Underneath the personalized note is a spot for your classroom wish list. I recommend you change the wish list each week so parents have new options for how they can support your classroom.
Donors Choose
Your classroom newsletter is a great way to let parents know you’re fund raising to get a 3D printer.
More Newsletter
At the bottom put your additional newsletter information.
Parent Connection
Below the additional newsletter information is a place to list specific questions parents can ask their children. Instead of “What did you do at school today” and getting the typical “Nothing” parents can ask their child specific questions to help the parent review with their child.
Two Options
Autocrat
In the Google Sheets spreadsheet, with the list of student names and comments you created, install the Add-On “Autocrat.” (Click Here for a sample spreadsheet template.) Make a copy of the newsletter template you wish to use. Customize the template for your class. Use the Autocrat Add-On to merge the information from the spreadsheet with your classroom template. Autocrat allows you to email a PDF of the newsletter to each student and parent.
Teacher Newsletter
I created an Add-On script specifically for the teacher newsletters. Using Autocrat gives you more flexibility and options. The Teacher Newsletter Add-On is specific to the folder of templates. Teacher Newsletter lets you easily create a list for comments each week.
Template
How it Works
Use the spreadsheet template above to list your students names, student emails and parent emails. (Put your email address for email addresses you do not know.) Leave the rest of the template blank.

Add-On
Go to the Add-On menu and find “Teacher newsletter.”

Sidebar
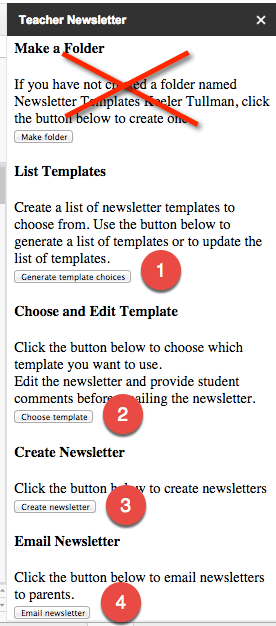
The sidebar menu walks you through the steps to use Teacher Newsletter.
Make Folder
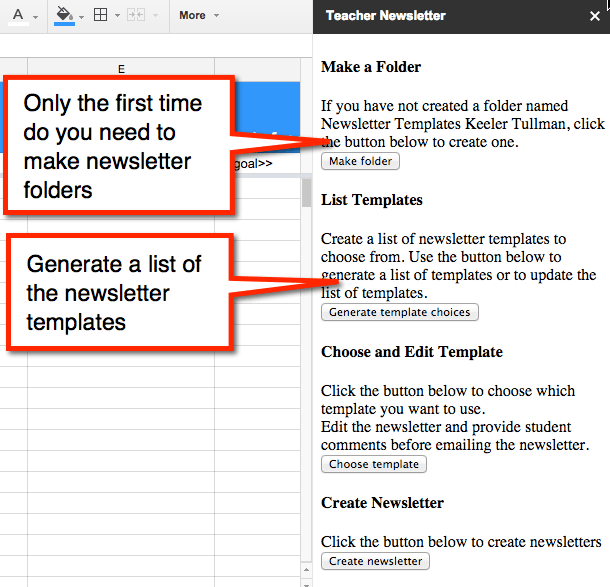
The first button allows you to make a folder for your newsletters. You will only need to do this once. The script is looking for this specific folder to put your newsletters in.
Generate Template Choices
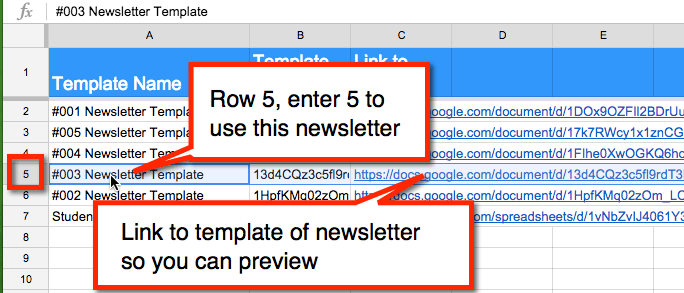
Hans Tullmann and I have been creating templates for the newsletters. You can find them in this folder. The second button, “Generate template choices,” will insert a sheet with a list of all the templates in the folder. You may want to use this button every week you make a newsletter to see if new templates have been added. (If you create a template you would like to contribute, please share it!).
Identify the row the newsletter you want is in. If you want the newsletter in row 5 you’ll want to enter 5 into the next set of directions.
Choose Template
The 3rd button allows you to choose your template. Have in mind what row from the previous step lists the newsletter you would like to use. Only enter the row number into the prompt.
After entering the row number of the template you wish to choose, a copy of that template will be created. A copy of the roster of students will also be created. You will want to click the “Choose template” button every week that you are generating a newsletter.
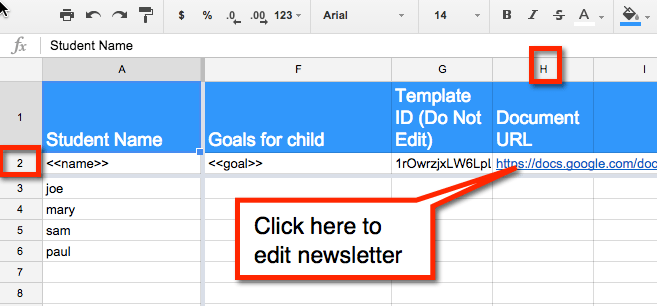
A copy of your roster will be created and a link to your copy of the template is placed in cell H2. You will be prompted to name your newsletter. You may want something like “Mrs Smith’s Week 10 Newsletter.” This is the name of the document for your newsletter and parents will see this name.
The script can take some time to run, be patient. The link to your copy of the newsletter will show up in H2.
Make Your Own Newsletter
Note that if you do not want to use one of the templates from my Google Drive folder you can create your own template that has the same merge tags. Simply delete the URL in H2 and replace it with the URL to your own template.
Edit the Newsletter
Opening the link in cell H2 will allow you to customize the newsletter template. Tip to edit your wish list every week to give parents new ideas for how they can support your classroom.
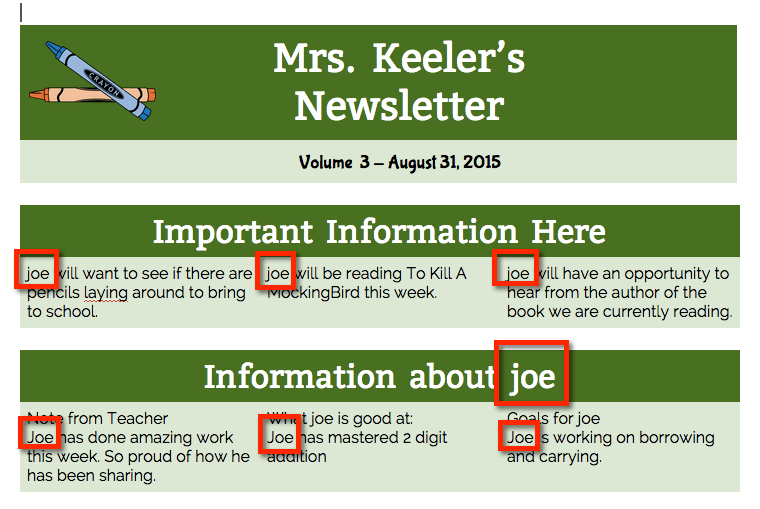
Merge tags are important!! Where you see <<name>> will be replaced with the child’s name. You can place this merge tag anywhere you wish.
Tip to word your newsletter as if you are speaking to the child or the child’s parents. Instead of “Reminder there is a field trip on Monday” instead write “Please remind <<name>> that there is a field trip on Monday.” Using the <<name>> merge tag is a great way to personalize the newsletter.
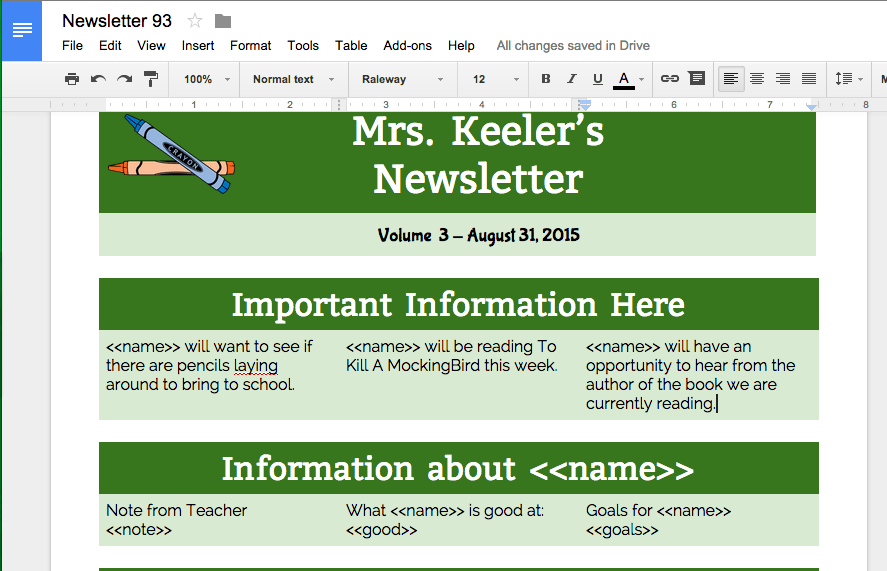
While you can use the <<name>> merge tag as often as you wish, you probably only want the <<note>>, <<good>>, <<goal>> merge tags once.
Comments in the Spreadsheet
The spreadsheet is set up to allow you to write a personal note about each student in column D. In column E reflect on what each child has accomplished that week and make a quick note. Column F allows you to reflect on what goals each child is working on that week.
Create Newsletters
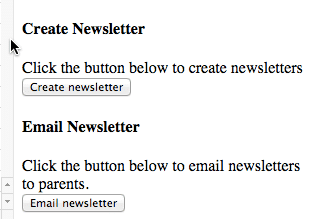
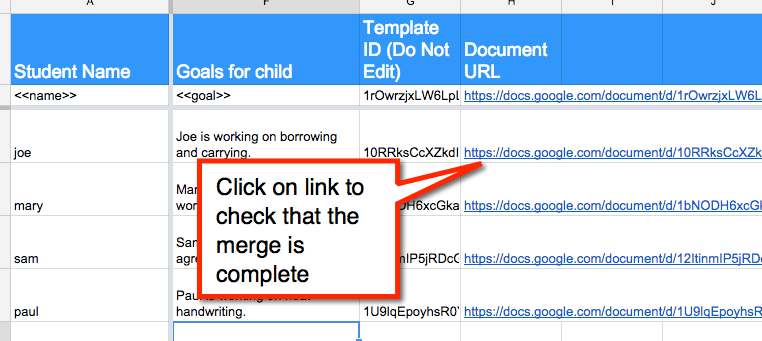
The 4th button creates a newsletter for each student in your class. The information for each student in the spreadsheet is merged with the Google Doc. This process can be slow. A link to each student’s individualized newsletter is placed on the spreadsheet.
Please be patient, it can take time for the merged values to appear in the newsletter. Check that the merge is completed before going on to the next step.
Newsletters that have completed the merge will not have the merge tags anymore.
Email Newsletters
After checking that the individual student newsletters look like you want them to, you can send the newsletters. The 5th button creates a PDF of the newsletter and emails the newsletter to the student and parent.
Note: you MUST enter valid email addresses for both the student and parent. If you do not have an email address for the student or parent use your email address instead.
If you put YOUR email address for any student or parent email address you will get the email of the newsletter. This can help to remind you which students you need to print onto paper their newsletter and send home with the child.
Make More Newsletters
You can use the same spreadsheet each week for your newsletters. Go back to the same spreadsheet. You should have a template of the roster of your students, their email address and their parents email address. You do NOT need to redo this every week
Go to the Add-On menu and choose “Teacher Newsletter.”
Each Week – Same Spreadsheet
In the sidebar you will SKIP the first option to make a folder. You already have this folder in your Google Drive. Each week you will want to generate the template list again to see if new options are available. Choose the template you want to use. A COPY of the student roster will be made to allow you to edit your template choice and insert comments. Create the newsletters and preview them. When you are ready, click the “Email newsletters” button.





19 thoughts on “Create Personalized Teacher Newsletters for Each Student”
Hi, Thank you for the tutorial! I look forward to using it. I’m trying to get my first newsletter out and it isn’t doing the last step of turning into a pdf document. Any suggestions?
Hmmm, you have to make sure you click all 5 buttons in the sidebar. I’ll test it.
This is a great resource! Is there a way to add more merge tags or would I have to figure out the scripts?
You would have to modify the script
I’m getting as far as “create newsletter.” When I click on it nothing happens, even if I have waited a half hour. Still nothing. Any suggestions?
There are many reasons a script can fail. Some of it is slow network. Also try running it on a Gmail account rather than GAFE account. Sometimes 3rd party scripts are blocked by the Google Apps Domain Admin.
I am having a hard time trying to get the Document URL to appear when I follow the steps after clicking the Choose and Edit template. Also, am I suppose to make a copy of the Newsletter templates folder so when I run the script it looks for the editable Newsletter files?
You should not have to make copies
My district has Drive add-ons blocked. Is there any other way to get this working? Wishful thinking perhaps… 🙂 Looks awesome though!
🙁 Get them to undo that.
This is greatgreatgreatgreat! As always, Alice, you inspire me. One thought I had about the personalization piece is that we could use a Form for students to provide weekly (or more frequent) reflections on their learning. Would it then be possible to run some Sheets magic to automate pulling their reflections into the personalized newsletter template?
Hi Alice, Really enjoyed your conference in Auckland New Zealand on Friday. I have tried this but our google accounts in school are blocked from using third party apps. A real pain. Admin say its dangerous and we are going to be attacked by little clicky menu viruses.
Any thoughts on that? Is there anything I can say in its defence?
Honestly, it would be possible for a bad person to write malicious code into a 3rd party app. It’s not fully unfounded. Want to make sure you’re using projects from honest people you trust. Most schools let people run my projects. I don’t do bad things. One thing that might be able to be accomplished is to have the apps admin install the add on from the admin panel and push it out.
Once you’ve gotten the hang of this, about how much time would you say it takes to do this on a weekly or biweekly basis? I love the idea, but I have 150 students and am wondering if I legitimately have time to do this well.
Trade it out for other things. It is valuable and it works to build those relationships that do lead to learning. What can you give up? I vote grading, for the kids I’ll give up grading! If you have 150 do half one week and the other half the other week. Odd periods and even periods.
What a cool idea! Not sure I would have time to do this monthly with my 130 high school students, but definitely something to try to figure out… maybe once a semester!
YOU CAN! I would argue it has bang for your buck, it has a good return on investment of your time. Keep the spreadsheet open all week and put those observations in. You can send out at least every other week.
If you have two parent emails to enter, can you enter both?
You should be able to use a comma