


Google Forms allow you to collect information from students. One thing I use Google Forms for is to have students sign into class. Once a week I ask for students “Comments, Questions, Concerns or Compliments” to allow me to hear from every student in the class. The information from the Google Form goes to a Google Sheets spreadsheet. This allows me to individually respond to each student. Using a mail merge Add-On allows me to send an email response to each student.
Quick Directions
- Create a Google Form for a Sign In sheet with a question for day of the week.
- Use “Go to page based on answer” so that one day a week students are asked “comments/questions/compliments/concerns.”
- Create a feedback column in the spreadsheet to respond to student comments.
- Use “Yet Another Mail Merge” Add-On in the spreadsheet to send weekly feedback to students.
Step By Step Directions
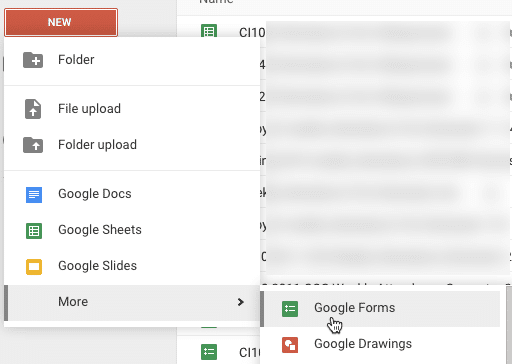
Create a Google Form
In Google Drive click on the “NEW” button and choose “Google Forms” from the more tray.
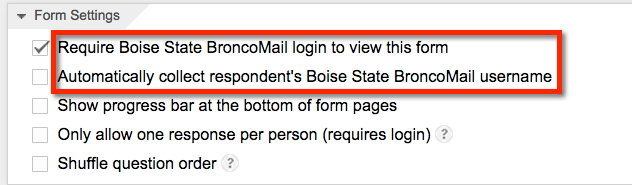
Form Settings
I usually UNCHECK the first checkbox that requires students to be logged in with the Google Apps (GAfE) account. If your students are not 1:1 with GAfE accounts you will probably want to uncheck this checkbox.
Name the Form
Giving the Google Form a title saves the Google Form with the same name by default.
Student Demographics
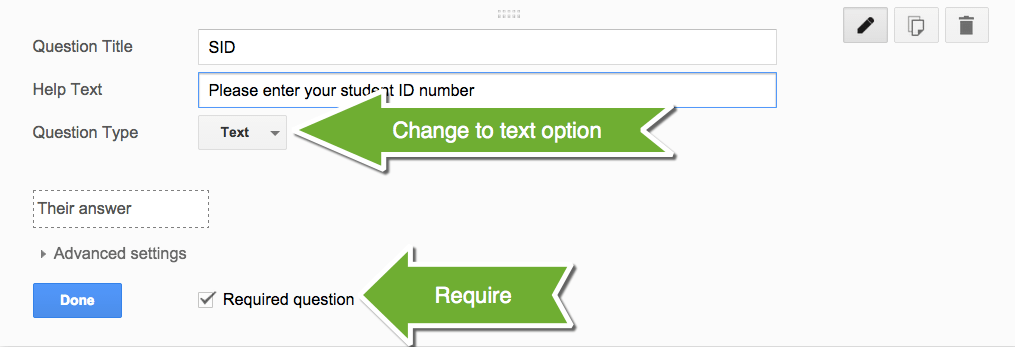
I always ask for the students ID number (SID) because it makes sorting the information from the students easier. When I ask for student names if they spell it differently or use nicknames I am not able to sort by student. I also ask for first name separately from last name. I also always ask for email address. You will not be able to email back personal responses if you do not collect the email address. You may also want to ask for the period the student is in if you are teaching at the secondary level.
By default the first question is a multiple choice question. Change this to a text style question. I recommend that you require the question to ensure that students fill out all parts of the form.
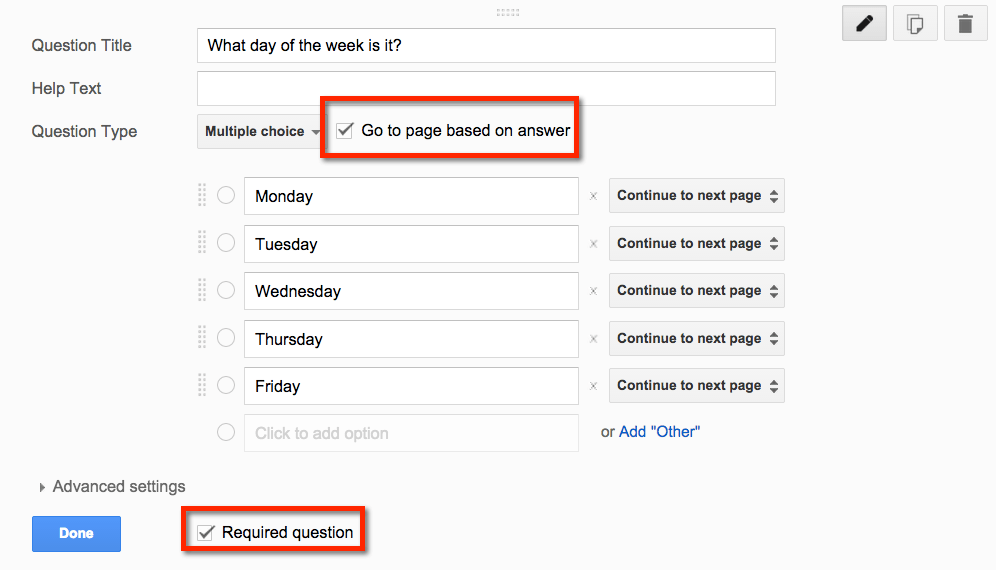
Day of the Week
While it would be nice to gather comments from students everyday, it is probably too much for you to be able to respond daily. Choose a day of the week that you ask students for comments/questions/concerns/compliments. Create a multiple choice question to ask students what day of the week it is. Check the “Go to page based on answer” option. You will come back to this question to set these options. Suggestion to require this question also.
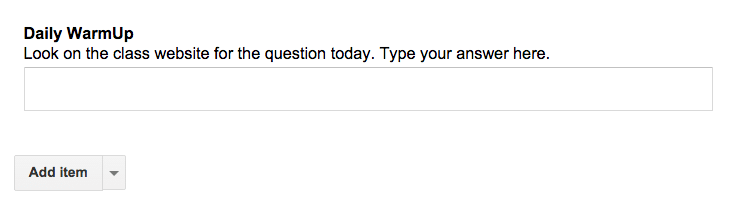
Warm Up
If you want you can use the sign in sheet for students to submit an answer to a daily warm up. Add a new question by clicking on the arrow next to “Add item” and choosing “Paragraph text.”

This will be a generic box, you will have to display the daily warm up question on your class website or on the board.
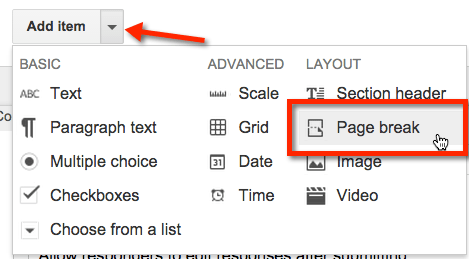
Create a Page
You will want to create a separate page for if students will be giving you comments/questions/concerns or compliments. Click on the arrow next to “Add item” and choose “Page break.”
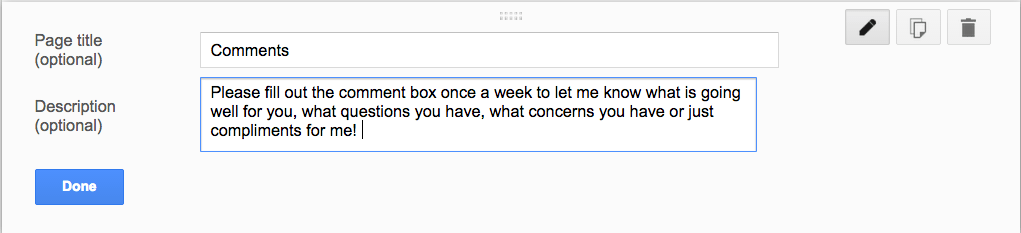
Name the new page “Comments” or whatever you would like.
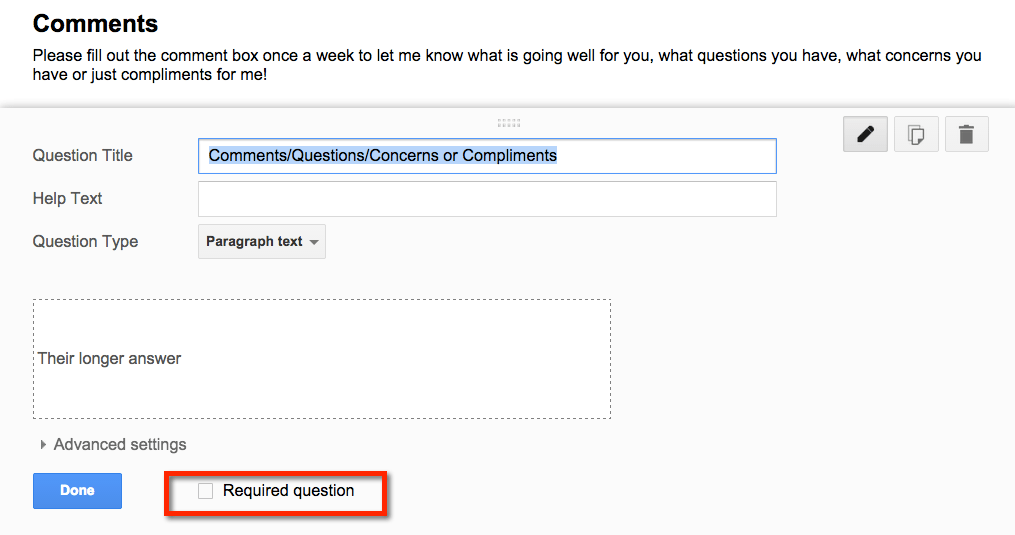
Comment Box
Create another paragraph text question to ask for comments/questions/concerns/compliments. You may want to create 4 separate boxes if you want students to give you one of each. Do NOT require this question. Students will only see this once a week. If you require the question and they only see the question once a week they will not be able to submit the form the other days.
Create a Page
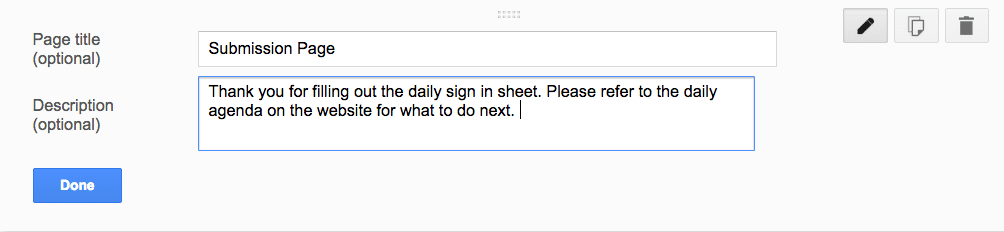
Create another page. Name this page “Submission Page.” This will be the final page students will see before submitting. You can ask additional questions here or just provide a generic message of what students will do after they submit the form.
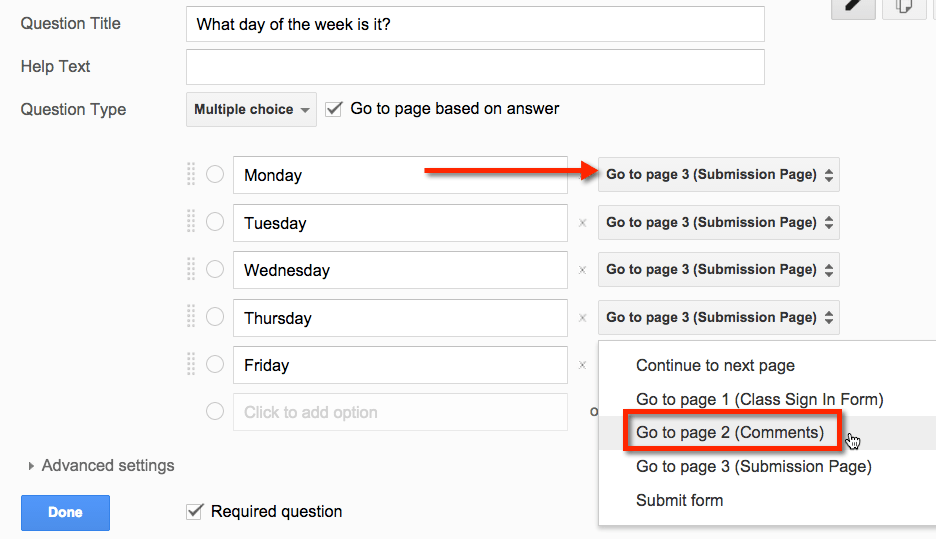
Change Multiple Choice
Go back to the multiple choice question asking what day of the week it is. You want to set the answers to jump to a page in the Google Form. For the days you will not be collecting comments set the response to “Go to page 3 (Submission Page).” For the one day of the week you will collect comments, set the response to “Go to page 2 (Comments).”
Live Form
Your form is complete. Click on “View live form” in the toolbar. CLICK HERE to see my sample.

Use this URL
While viewing the live form use Control L to highlight the URL. Use Control C to copy the URL. Notice the end of the URL says /viewform. It is important to check that you do not have the /edit on the URL. Paste this URL into the About page on Google Classroom or as a live hyperlink on your classroom webpage. Students will go to this URL daily to sign into your class.
Spreadsheet
If this is your first time using Google Forms the responses default to the Google Form. You want the responses to go to a spreadsheet. Click on “View responses” in the toolbar.

The settings are defaulted to create a spreadsheet and to make a spreadsheet for every Google Form in the future. You want this. Click on the “Create” button.

Now when you click on the “View responses” in the toolbar it will open the connected spreadsheet.
Feedback
Create a column header in the spreadsheet called “feedback.” In this column respond to each students comments/questions/concerns/compliments. You can also respond to their response on the warm up question.

Edit Column Headers
It is easier to do a mail merge if your column headers are a single word. Suggestion to change any header that is more than word to a single word. CLICK HERE to see my sample spreadsheet.
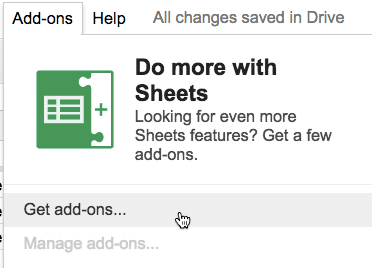
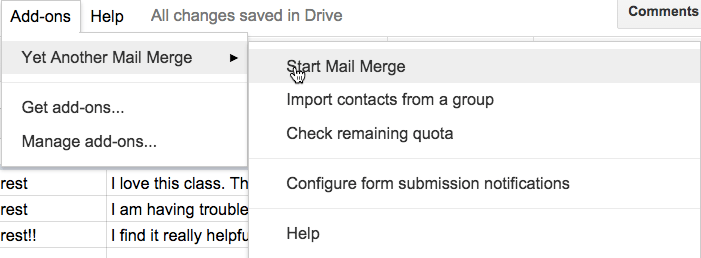
Add-On
Go to the Add-on menu and choose to “Get add-ons…”
Mail Merge
Search for “mail merge” and choose the “Yet another mail merge” Add-On.

Create an Email
Go to your email and compose an email. You can use this to create a newsletter to remind your students of important things they need to know. You can merge in information from the spreadsheet by using the merge tags <<column header>>. Put double less than and then the name of the column header you want to merge and then double greater than.

Draft
You do not send your email. Leave it as a draft. There is no save button, Gmail saves as drafts automatically. You can x out of the email when you are done composing it.
Back in the Spreadsheet
Once you have created a draft of the email you will send to the students that includes the merge tags, go to the Add-ons menu. Choose “Yet Another Mail Merge” and “Start Mail Merge.”
Choose Email Column
The Add-On will ask you which column is the recipients email. Choose from the drop down list the email column. Click Save.

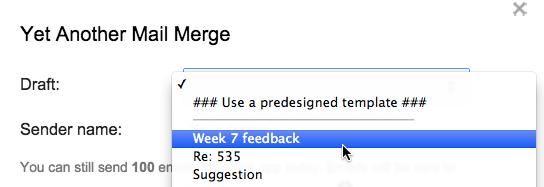
Choose your Draft
From the drop down list choose the draft email you just created. It should be listed at the top if you recently made it.
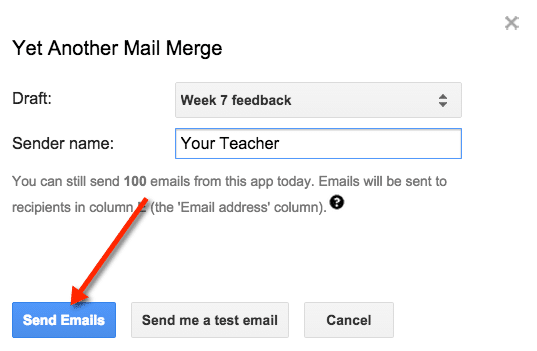
Send
Type your name under “Sender name.” This is what students will see in their email inbox as the person the email is from. You may want to write something like “Biology Teacher” if you want your students to know which class it is from. Click “Send Emails” to send out the individualized emails. Repeat weekly.
Merge Status
Notice on the spreadsheet a column is created for “Merge status.” For the responses that students submit the other 4 days of the week you will want to copy and paste the message “EMAIL_SENT” into the “Merge status” column. This way when you send emails out the following week the days that you did not collect comments will not be emailed out.

To copy the status to the student responses from the other four days a week, click on a cell that says “EMAIL_SENT.” Notice the blue box that is created around the cell. In the bottom right hand corner of the cell is a blue square. Click and hold down on the square. Take your mouse and pull DOWN to fill down the “EMAIL_SENT” message. Be careful NOT to copy this message for the rows that you do want to send the mail merge on.


