


Teachers know that YouTube is one of the most valuable libraries in the world. It brings historical events, scientific phenomena, and expert voices directly into our classrooms. While we often use it to simply play a video, the platform offers so much more than just a “Play” button. There are hidden features and shortcuts designed to help you search smarter, manage playback better, and make videos more accessible for every student. Here are 10 practical tips to help you get the most out of the YouTube tools you already use.
Delivering high-quality content, tools, and support for reading comprehension
ReadWorks is a free, research-based website designed to support educators in teaching reading comprehension across grades K–12. It provides a rich library of high-quality, standards-aligned instructional content.
Article-A-Day, helps students build knowledge and vocabulary in just 10-minutes a day.
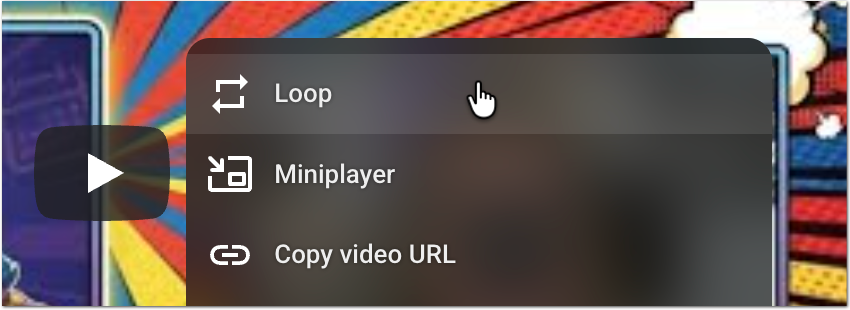
1. Right Click to Loop
You usually play a video once and it stops. Sometimes the screen goes black or shows suggested videos you do not want students to see. There are specific times when keeping the video playing is better for learning.
Why You Want to Do This
Station Rotations: You can set up a computer at a lab station with a 30-second clip showing a technique. It plays over and over so students can watch, practice, and watch again without touching the mouse with messy hands.
Deep Observation: When analyzing a complex phenomenon, like a cell dividing or a chemical reaction, students miss details on the first view. Looping it allows for a “Notice and Wonder” activity where they can look for something new each time.
Ambiance: If you use “study with me” videos or nature scenes for writing prompts, looping ensures the mood is not broken by the video ending.
How to Do It
Right click on the video itself. A menu appears. Select Loop. A checkmark will appear next to the word Loop. The video will now play endlessly until you turn it off.
2. Picture in Picture
If you just use the mini-player button on YouTube, the video disappears when you switch tabs. You need the video to float on top of your other windows so you can see it while you are checking email or grading assignments in a different tab.
Why You Want to Do This
Grading: You can watch a student’s video submission in the corner of your screen while you have the rubric or gradebook open in the main window.
Guided Notes: Students can keep the instructional video playing in the corner while they type their answers in a Google Doc. This prevents them from having to split their screen or flip back and forth between tabs.
Lesson Planning: You can watch a tutorial or resource video while you simultaneously type your lesson plan in a different window.
How to Do It
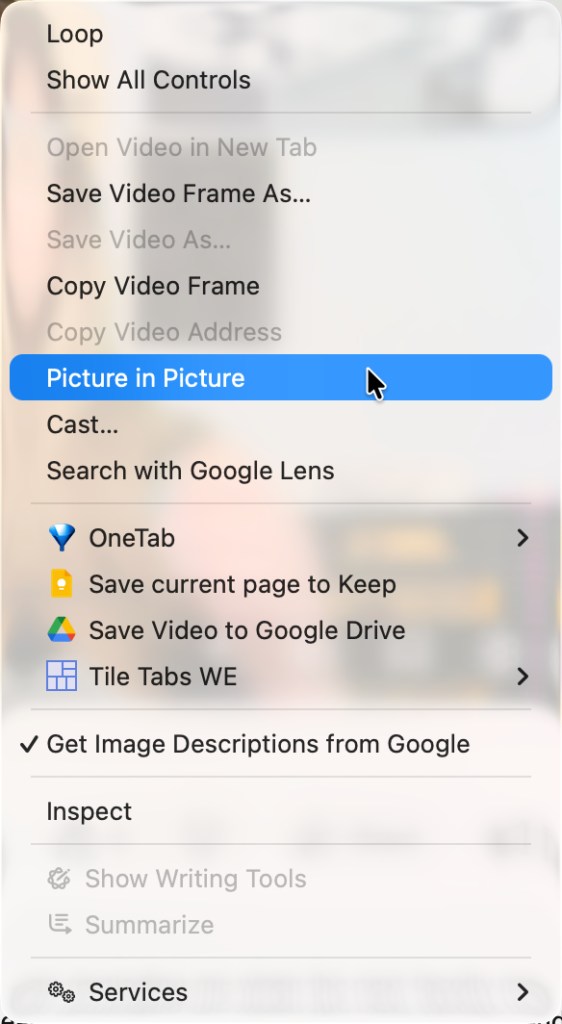
The trick is that you have to right click twice.
Right click on the video. You will see a black menu. Do not click anything yet. Move your mouse a little bit and right click again. You will see a white menu. Select Picture in Picture.
This pops the video out of the browser tab. It will now float over any other tab or application you open. You can drag it to any corner and resize it. To close it, click the X on the floating video or the icon in the original tab.
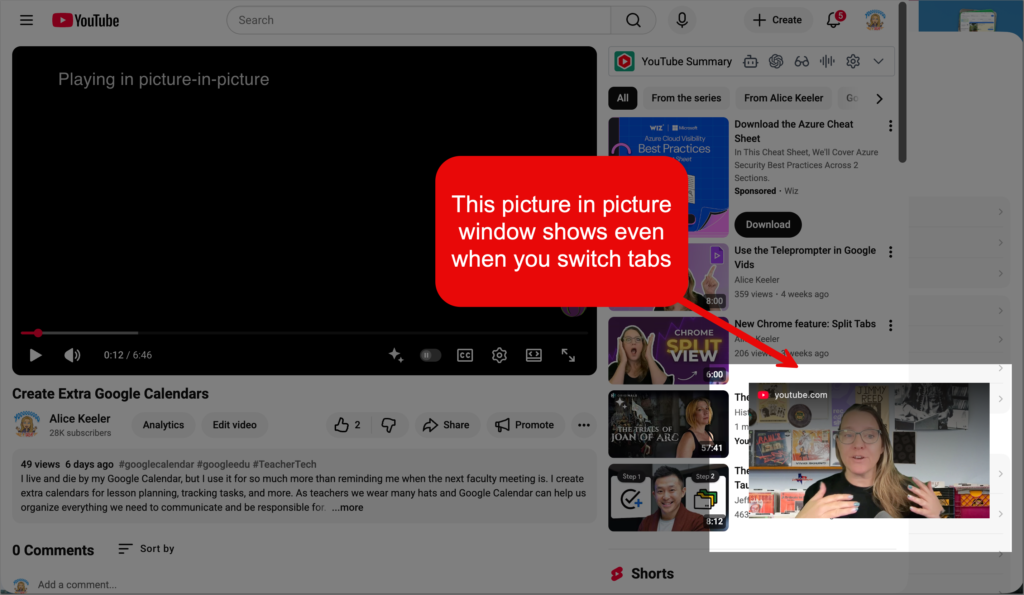
Have the video float over Chrome so you can switch tabs.
3. Open the Transcript
Did you know that every video in YouTube has a transcript? It’s automatically generated, so check it for accuracy. It’s a little hidden, so check this out and help your students view the transcript while they watch.
Why You Want to Do This
Vetting Content: As a teacher, you want to quickly ensure the video covers the right vocabulary. You can scan the text in two minutes to see if it is a good fit for your lesson before watching the whole thing.
Literacy Support: You can have students keep the transcript open while they watch. This helps them connect the spoken word to the written word. It supports reading fluency and helps them catch words they might miss in the audio.
Differentiation: For students who struggle with auditory processing, seeing the text reduces anxiety and increases comprehension.
How to Do It
Look at the description box below the video player. Click the …more text to expand the description. Scroll down to the bottom of the description section. Click the button that says Show transcript. The full text of the video will appear in a sidebar on the right side of the screen.
4. Search the Transcript
Finding the exact moment a specific topic is mentioned in a video can be challenging. Scrubbing the timeline with your mouse is often imprecise. Since you have the transcript open, you can use it to search the video text just like a document.
Why You Want to Do This
Efficient Research: This allows students to locate specific information within longer documentaries or lectures. They can quickly find the relevant concepts they need to support their learning.
Evidence Gathering: Students can easily find exact quotes and timestamps to support their arguments or complete an assignment.
Lesson Prep: You can quickly check to see if a video covers the specific vocabulary or standards you are teaching without watching the entire duration.
How to Do It
First, make sure the Transcript is open (see tip 3).
Method 1: The Search Bar Look at the top of the Transcript window. There is a Search in video bar. Type your keyword there. It will filter the transcript lines to show only the ones that contain your word.
Method 2: Control F If you do not see the search bar, you can use your browser shortcut. Press Control F (or Command F on a Mac). Type your word. The browser will highlight the word in the text.
Clicking on any line in the transcript will jump the video player to that exact spot.
Educator AI Assistant
Collects NO User Data
Use AI to create lesson plans, rubrics, newsletters, anything you want.
Educator AI Assistant is different by collecting ZERO data. Shows you the prompt and allows you to edit and share.
Runs locally in your own Google Sheets™.
Fully transparent and customizable.
Created by AliceKeeler
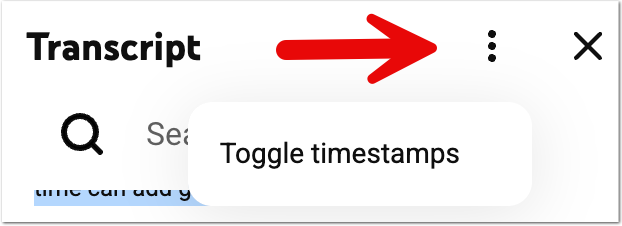
5. Toggle Timestamps
You often need the actual text from a video to create a resource. The default view puts time numbers next to every line. This adds extra formatting you usually do not want. You can turn these off before you copy the text.
How to Do It
Open the Transcript window. Click the three vertical dots in the top right corner of that window. Select Toggle timestamps. The numbers will disappear. Click and drag your mouse to highlight the text you want. Press Control C (or Command C on a Mac) to copy it. Paste it into your document.
Slides to Spanish+ by AliceKeeler

Collects NO User Data
Convert your Google Slides™ to “ANY” language.
Creates a copy of your Google Slides with a quick option to convert to Spanish. Use the sidebar to select any language supported by Google Translate™. FREE
6. Start at Specific Time
You lose instructional time when you have to find the right spot in a video. Sending a link to the beginning of a video often leads to students getting distracted by the intro. You can create a link that starts exactly where you want it to.
Why You Want to Do This
Focus: It keeps students focused on the specific lesson concept rather than the YouTuber’s introduction.
Efficiency: It eliminates the need to scrub the timeline in front of the class to find the right moment.
How to Do It
You can do this two ways.
Method 1: The Share Button Go to the specific second in the video you want to share. Click the Share button. Check the box that says Start at. Copy the link that is generated.
Method 2: Right Click Pause the video at the exact moment you want. Right click on the video player. Select Copy video URL at current time. This copies the specific link to your clipboard instantly.

7. Control the Video with Keyboard Shortcuts
You use the mouse to control YouTube. It is slow. It creates a pause in your teaching while you look for the cursor. You can use your keyboard to control everything. This keeps your head up and your focus on the students.
Why You Want to Do This
Note Taking: Students can jump back 10 seconds to hear a definition again. It helps them capture information without asking you to rewind.
Narration: You can mute a video instantly to explain a visual yourself.
Flow: You do not have to turn your back to the class to fiddle with the timeline. You can control the video quickly.
How to Do It
K to Pause The spacebar often scrolls the page down. This is annoying. Press the K key to pause and play. It works no matter where you clicked last.
J and L to Skip Dragging the red dot on the timeline is not accurate. Press J to jump back exactly 10 seconds. Press L to jump forward exactly 10 seconds.
M to Mute Press M to silence the audio instantly. Press it again to turn the sound back on.
Arrow Keys Use the Left and Right arrows to jump back and forward 5 seconds. Use the Up and Down arrows to change the volume.
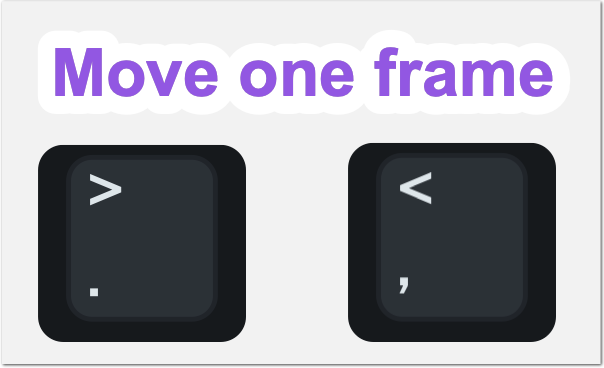
8. Frame by Frame Analysis
Science and physical education teachers often need to see details that happen very quickly. Standard video speed is too fast to see the release of a basketball or the moment a chemical color change happens. You can watch a video one frame at a time to catch these micro-movements.
Why You Want to Do This
Data Analysis: Students can look at the trajectory of an object in a physics lab.
Skill Improvement: In PE or dance, students can check their form. They can see the exact angle of their elbow or the placement of their foot.
Observation: You can identify the precise micro-second a reaction occurs in chemistry. This turns a video into a scientific instrument.
How to Do It
First, pause the video. You can use the K key for this. Press the . (period) key to move forward one single frame. Press the , (comma) key to move backward one single frame.
Daily Agenda Slides
Collects NO User Data
Add-on for Google Slides™ to automatically add a slide to the top of your Google Slides™ with the date. Use this to post your agenda and display for students. This gives students and guardians easy access to “what did we do today?”
Keep an ongoing record of the daily agenda for your class. Use the same Google Slides™ all year!
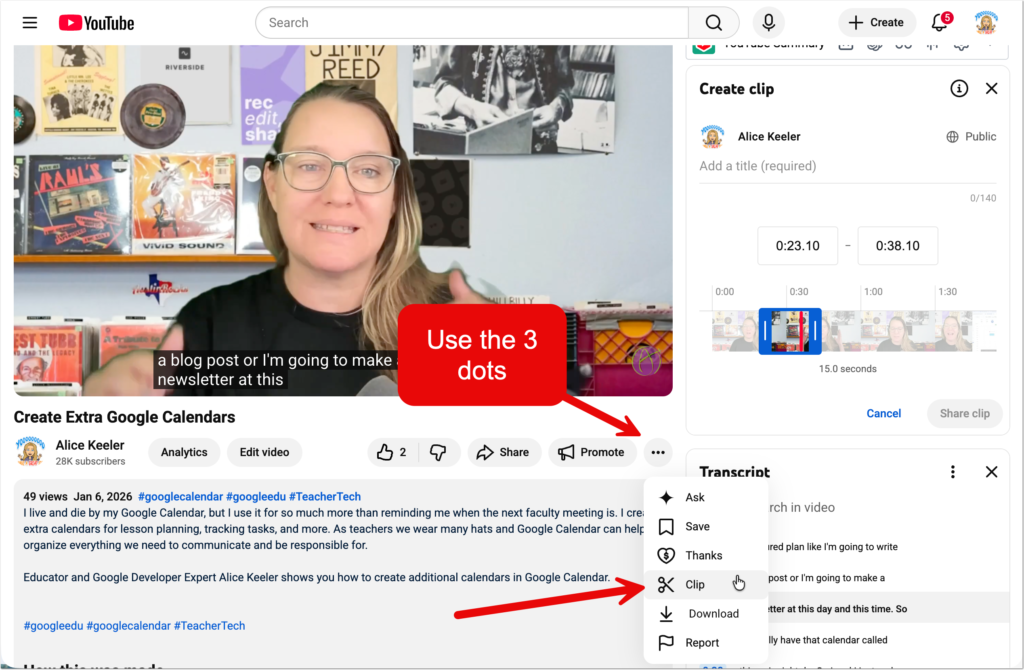
9. Clip It
You often find a long video that has one perfect minute of content. You do not want to send students the link to the whole video. You can create a clip that loops just that specific section.
Why You Want to Do This
Evidence: Ask students to use this for evidence. In addition to summarizing a video, ask them to clip the specific part that proves their point. It teaches them to be selective and cite their sources accurately.
Focus: You share exactly what matters. The clip loops so they see it multiple times. It prevents them from watching irrelevant content.
Curation: You can save these clips. You build a library of the best explanations without the fluff of the full videos.
How to Do It
Make sure you are signed into YouTube. Find the exact spot where you want the clip to begin and pause the video. This saves you time because the tool will start the clip right there. Look below the video player. Look for the horizontal 3 dots menu. Click the Clip option. It looks like a pair of scissors. A box appears on the right. Drag the slider on the timeline to select the part you want. It must be between 5 and 60 seconds. Give the clip a name. Click Share Clip and copy the link to the clip.
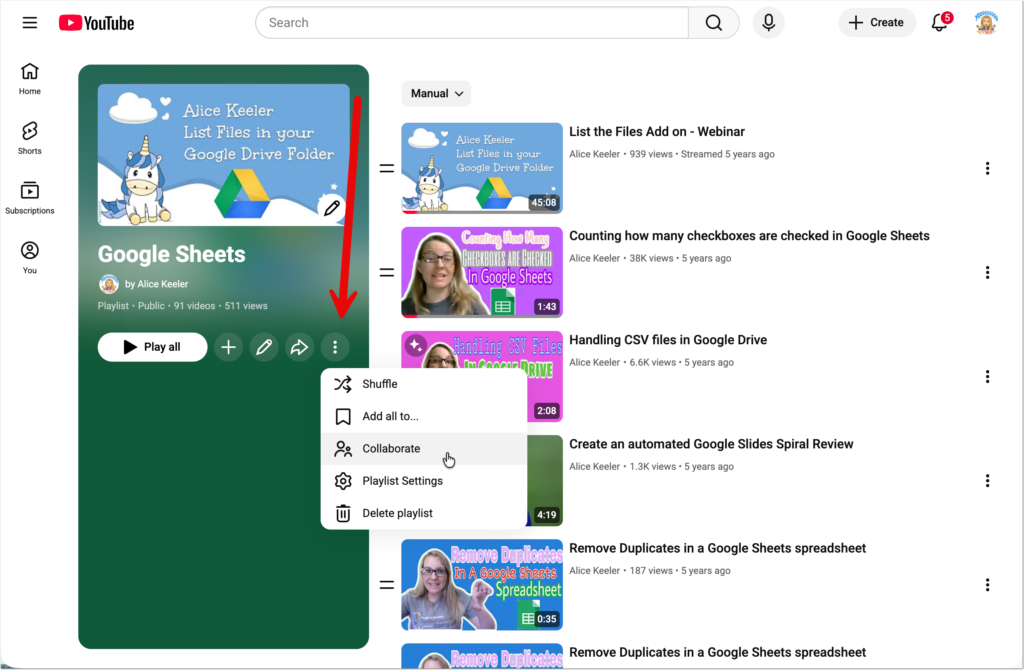
10. Collaborative Playlists
You usually find all the resources for your students. You can shift this responsibility to them. YouTube allows you to make playlists that other people can add videos to. This turns a playlist from a static list into a dynamic class project.
Why You Want to Do This
Crowdsourcing: Instead of you finding 30 videos, every student finds one. You cover more ground in less time.
Evaluation: Use this for a research unit. Ask students to find one reliable video source about their topic. They are asked to evaluate the quality before adding it to the class list.
Shared Library: This builds a persistent library of knowledge that the whole class can use for review or projects.
How to Do It
Create a new Playlist in your YouTube library. Open the playlist page. Click the three vertical dots next to the playlist information. Select Collaborate. Turn on the switch that says Collaborators can add videos. Copy the invite link and share it with your class.
Want more help with this?

Cancel Anytime
Benefits of Premium Membership
- Supports Teacher Tech.
- Exclusive Add-ons & Templates.
- Help with student-centered teaching.
- Office hours with Alice.
- Webinars & recordings.
Teaching with YouTube
These are powerful features that are ready for you to use. You likely use YouTube all the time but may not have noticed these features. They transform the site from a simple video player into a flexible teaching assistant. You can do so much more than just press play.


