By Guest Blogger, Alice Aspinall author of Everyone Can Learn Math!
Math in the World Around Us
Finding the math in the world around us is one of my favourite things. I love pointing out math topics that can be discussed from objects that seemingly don’t hold any math in them. I especially love when math is combined with other subject areas. Math and music go together beautifully, and math and art are a stunning combination.
My seven-year-old is a little artist and is happy to indulge in all of my math activities. I recently saw this post on Instagram using symmetry and dot paper, which gave me some inspiration to further explore grid paper art. My daughter and I have experimented with grid paper in the past in many different forms, including some dabbling with the Desmos graphing calculator. I have introduced her to more types of graph paper recently and taught her some new tricks on Desmos as well. You can purchase all different kinds of graph paper, or you can find free printables online. Try this website for all kinds of graph paper that you can print at home.
Using graph paper to create art opens the opportunity to discuss math topics while your child is creating the art. Try incorporating math vocabulary like horizontal, vertical, line, line segment, etc. This is also a chance for your child to practice using a ruler to create straight lines and encourage fine motor development. If you child is interested or ready, begin discussing coordinates using the x- and y-axes in a similar way to calling out coordinates while playing the game Battleship. There are so many ways to use graph paper to encourage math talk while creating art with your child. I will outline a few ways to explore art and math together.
Dry Erase Graph Paper
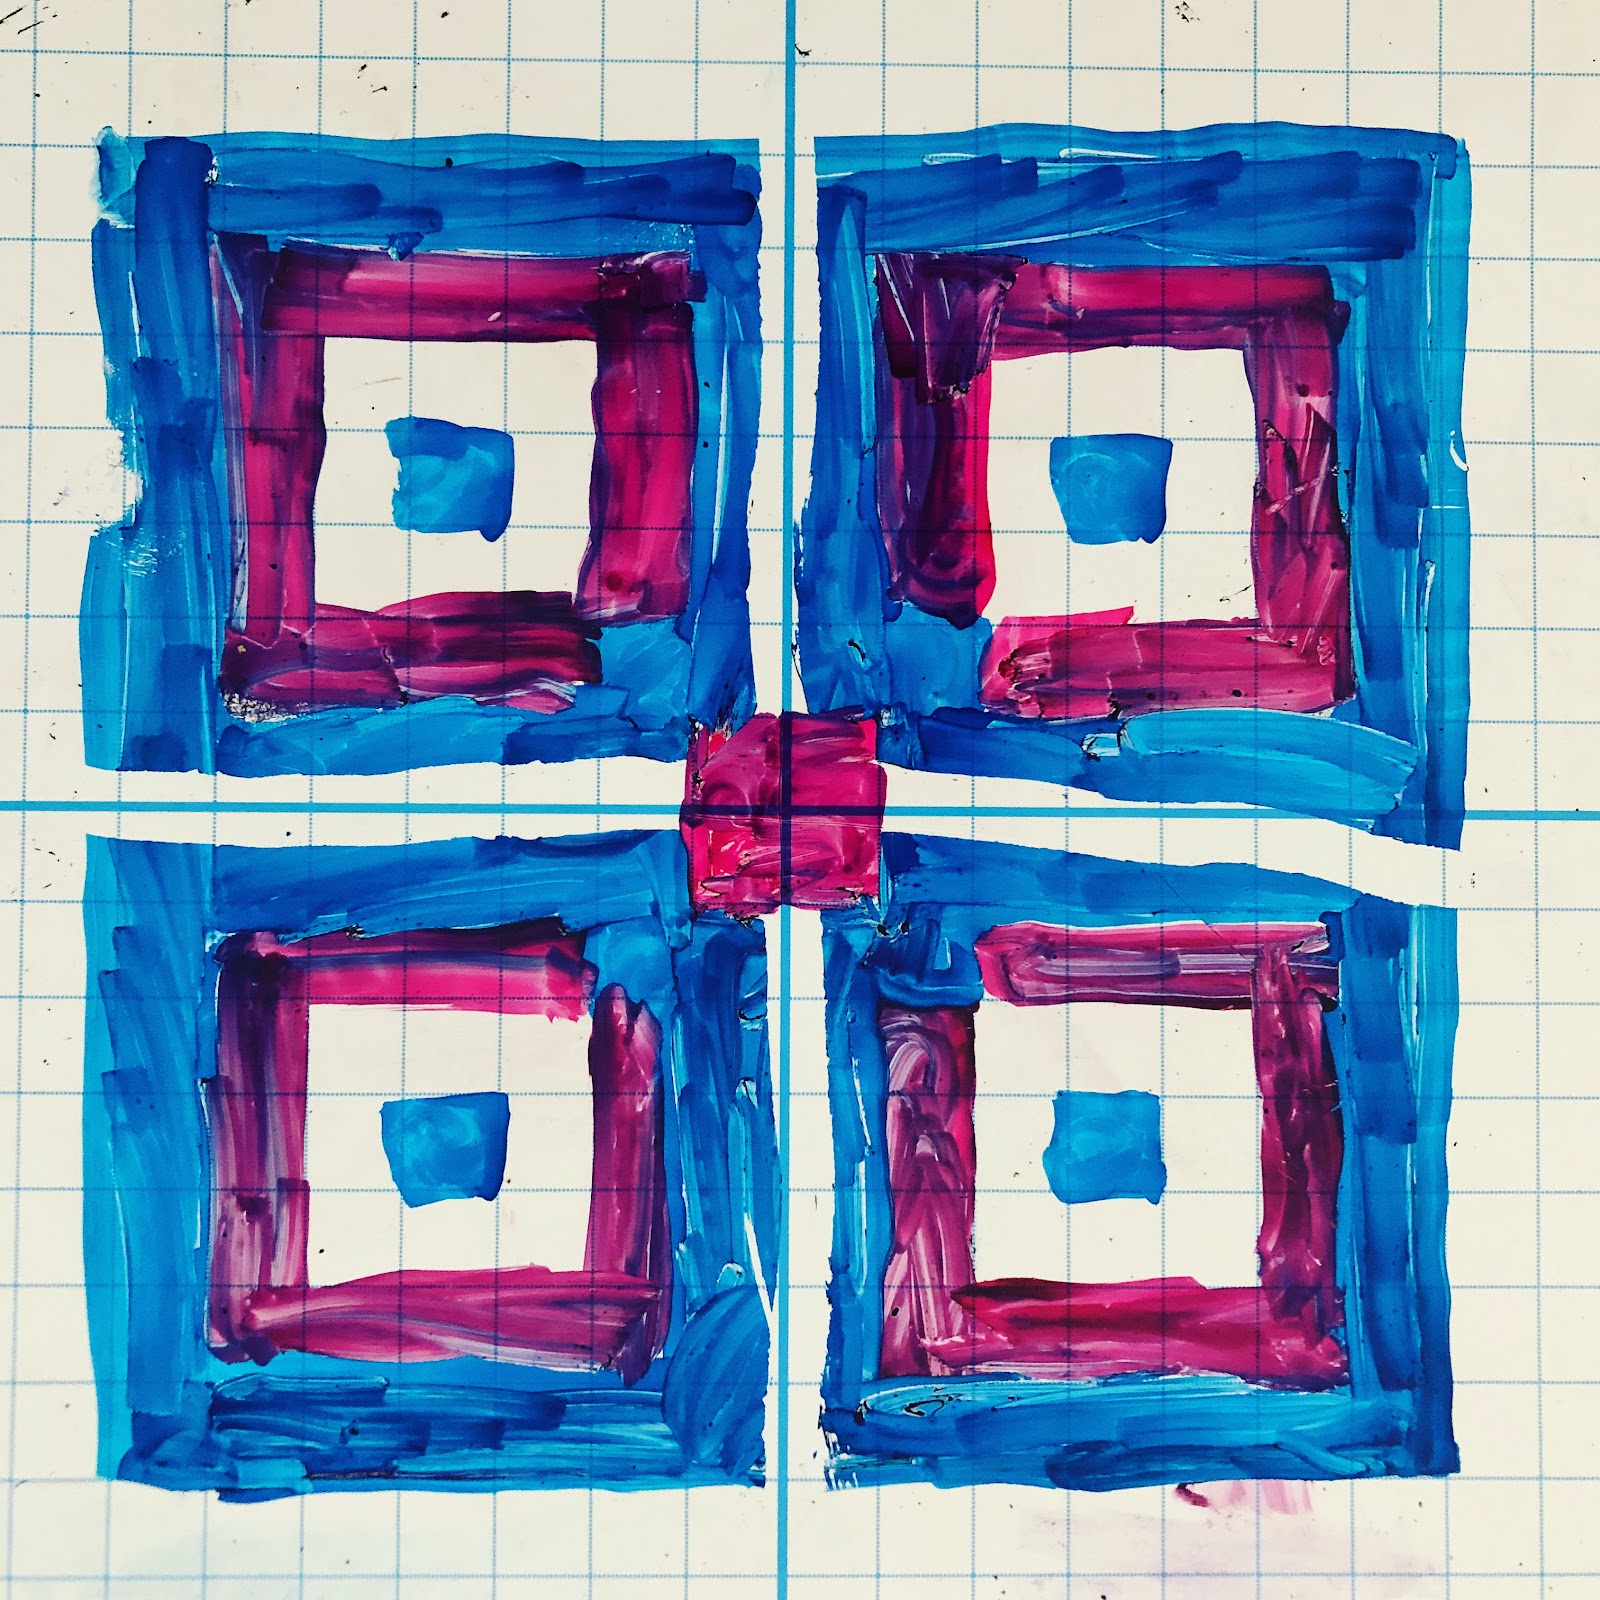
The kids love playing on whiteboards with dry erase markers – probably for the same reasons students love them in the classroom (check out the Thinking Classroom and research from Peter Liljedahl for more information). We have several mini whiteboards with a grid on one side. These are perfect for classroom use, but my kids at home like to draw and colour on them to create artwork using the squares of the grid as guides for drawing. This piece was done by my daughter with the goal of having rotational symmetry in each quadrant.
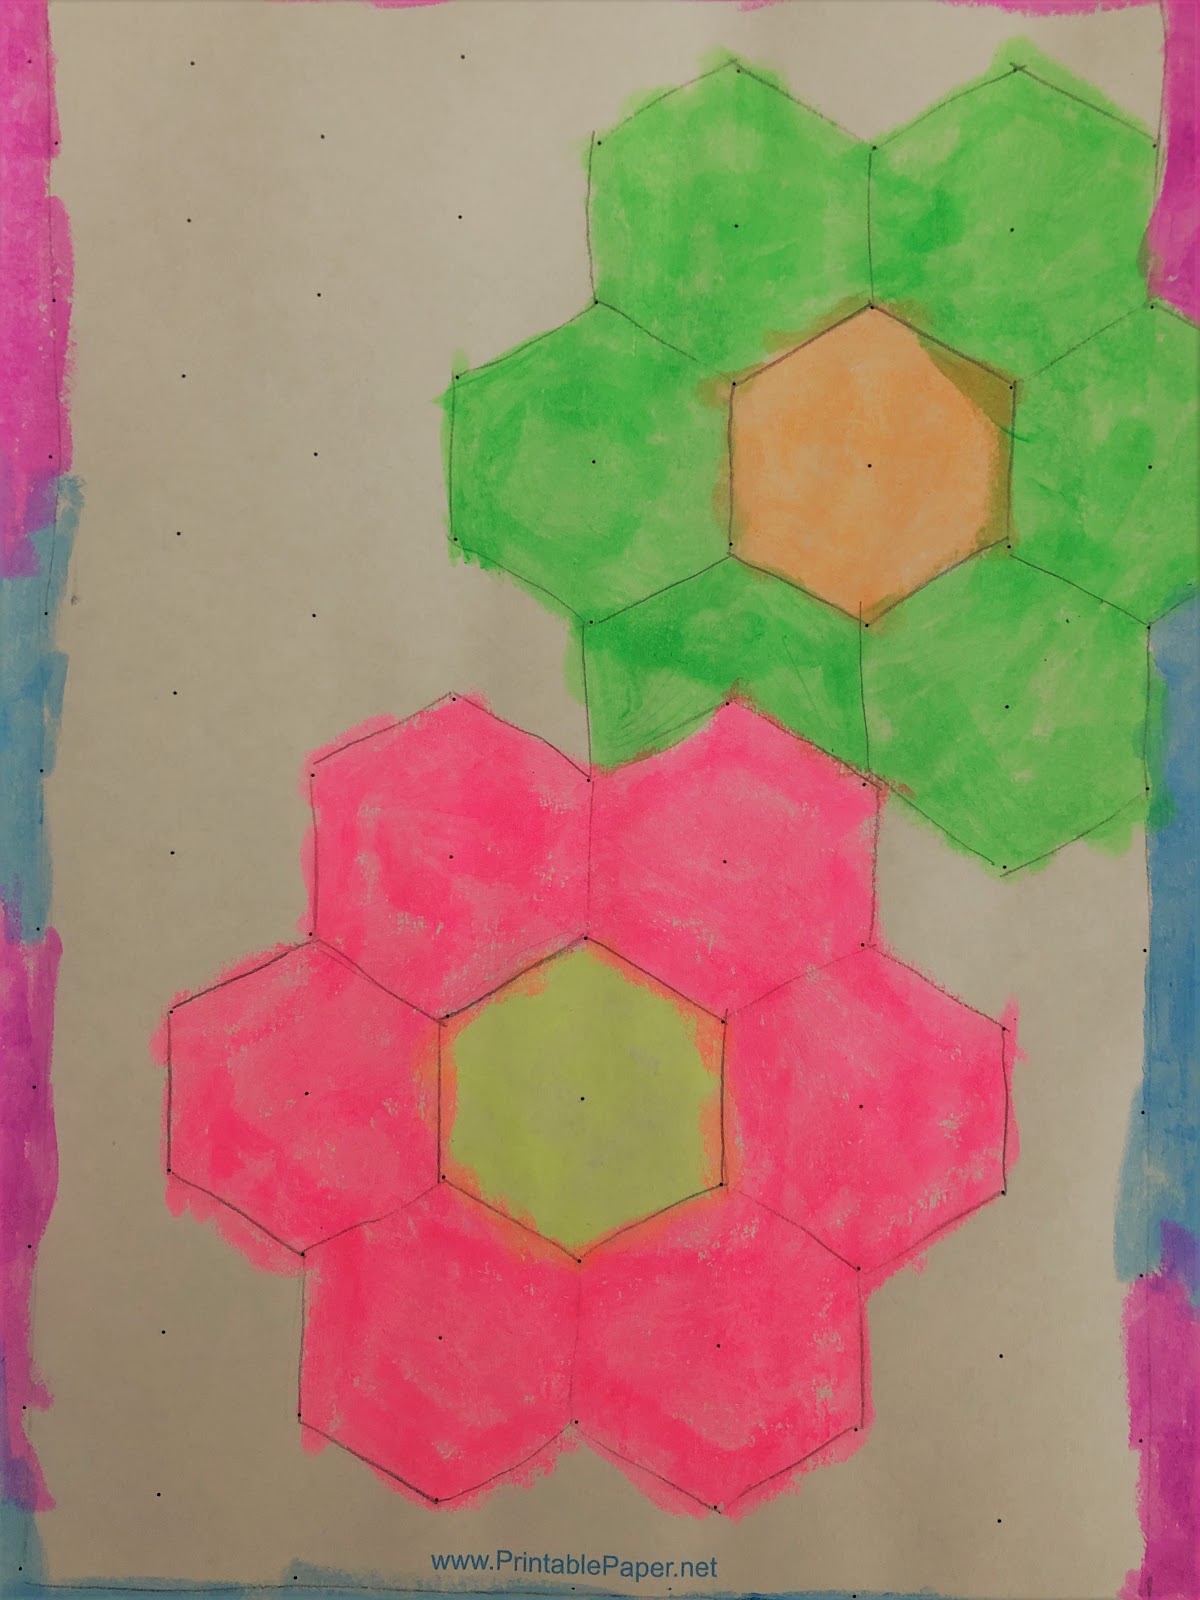
Isometric Dot Paper
Isometric paper is really intriguing for children because it doesn’t follow the horizontal and vertical lines of regular grid paper. Instead, the dots or lines are arranged in diagonal lines, which make drawing three-dimensional figures easier. My kids love “connecting the dots” to create pictures on isometric dot paper. You can also find isometric grid paper, as well as grid paper that follows other shapes such as hexagons or octagons.
This is an example of a picture done by my daughter on isometric dot paper:
Exploring Symmetry with Graph Paper
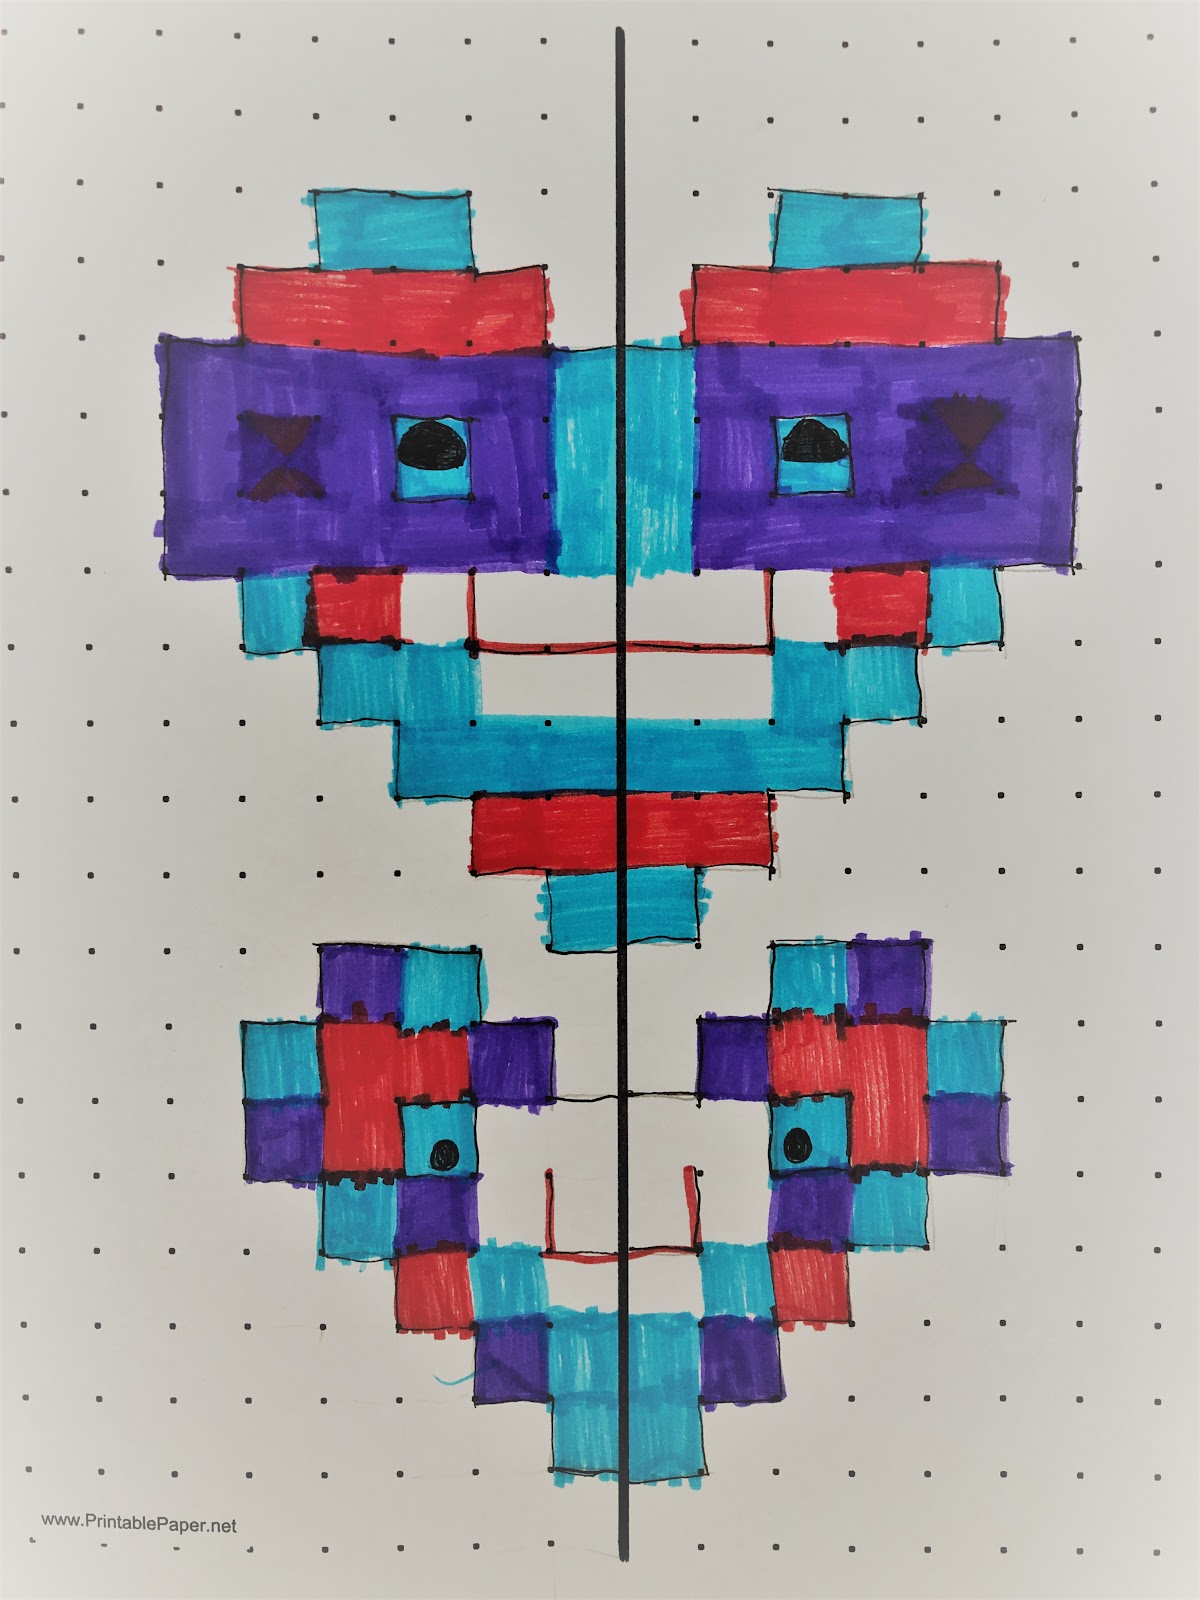
Another fun art activity using graph paper involves the use of symmetry. The x- and y-axes on a grid act as good symmetry lines for any art project and also act as a good introduction for symmetry of functions in advanced mathematics. However, you don’t have to bring the axes onto a grid to explore symmetry. In this example, I took some dot paper and drew a line down the centre. I asked my daughter to draw an image on one side of the line first.
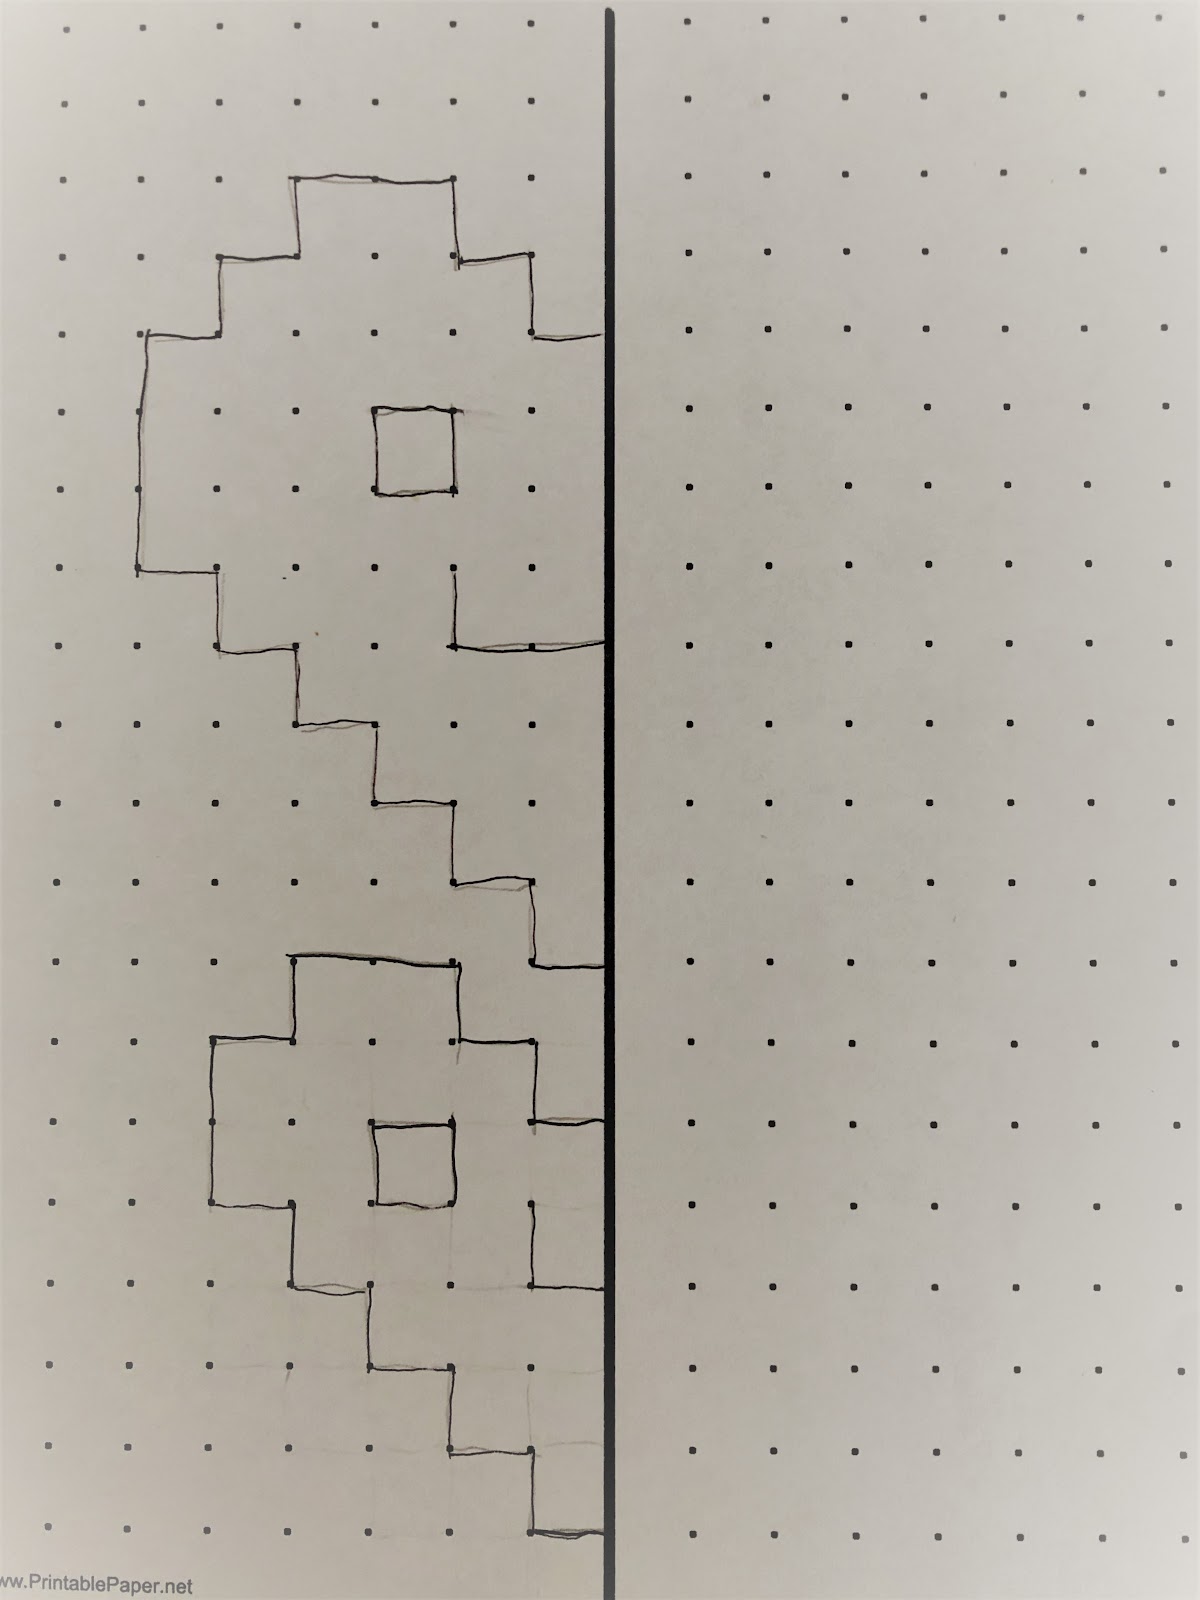
Then, I asked her to use the line of symmetry as a mirror and reflect the first image she drew on the other side. A good visual to help kids understand this symmetry is to show them that they can fold the page on the line of symmetry and the two sides should match up exactly.
Using Technology
I mentioned earlier that we have done a little exploring with online graphing calculators at home. Desmos is my favourite graphing app because it is free and easily accessible. The team at Desmos also does good work in equity in math education. You can use the online calculator or you can download the app on any device.
Our seven-year-old has used the calculator to create dot art in the past as she has learned coordinate points in terms of horizontal and then vertical values. She changes the colours of the points and is entertained for a long time simply creating designs with her points.
I wanted to introduce her to lines on the graph without using equations (because she’s too young still for y = mx + b), so I showed her the table of values feature and how to connect the points with lines. If your child can understand horizontal and vertical values, they can easily transition to a table of values by learning how the entries in the table work.
This is an example of a simple Desmos art project using points and lines:
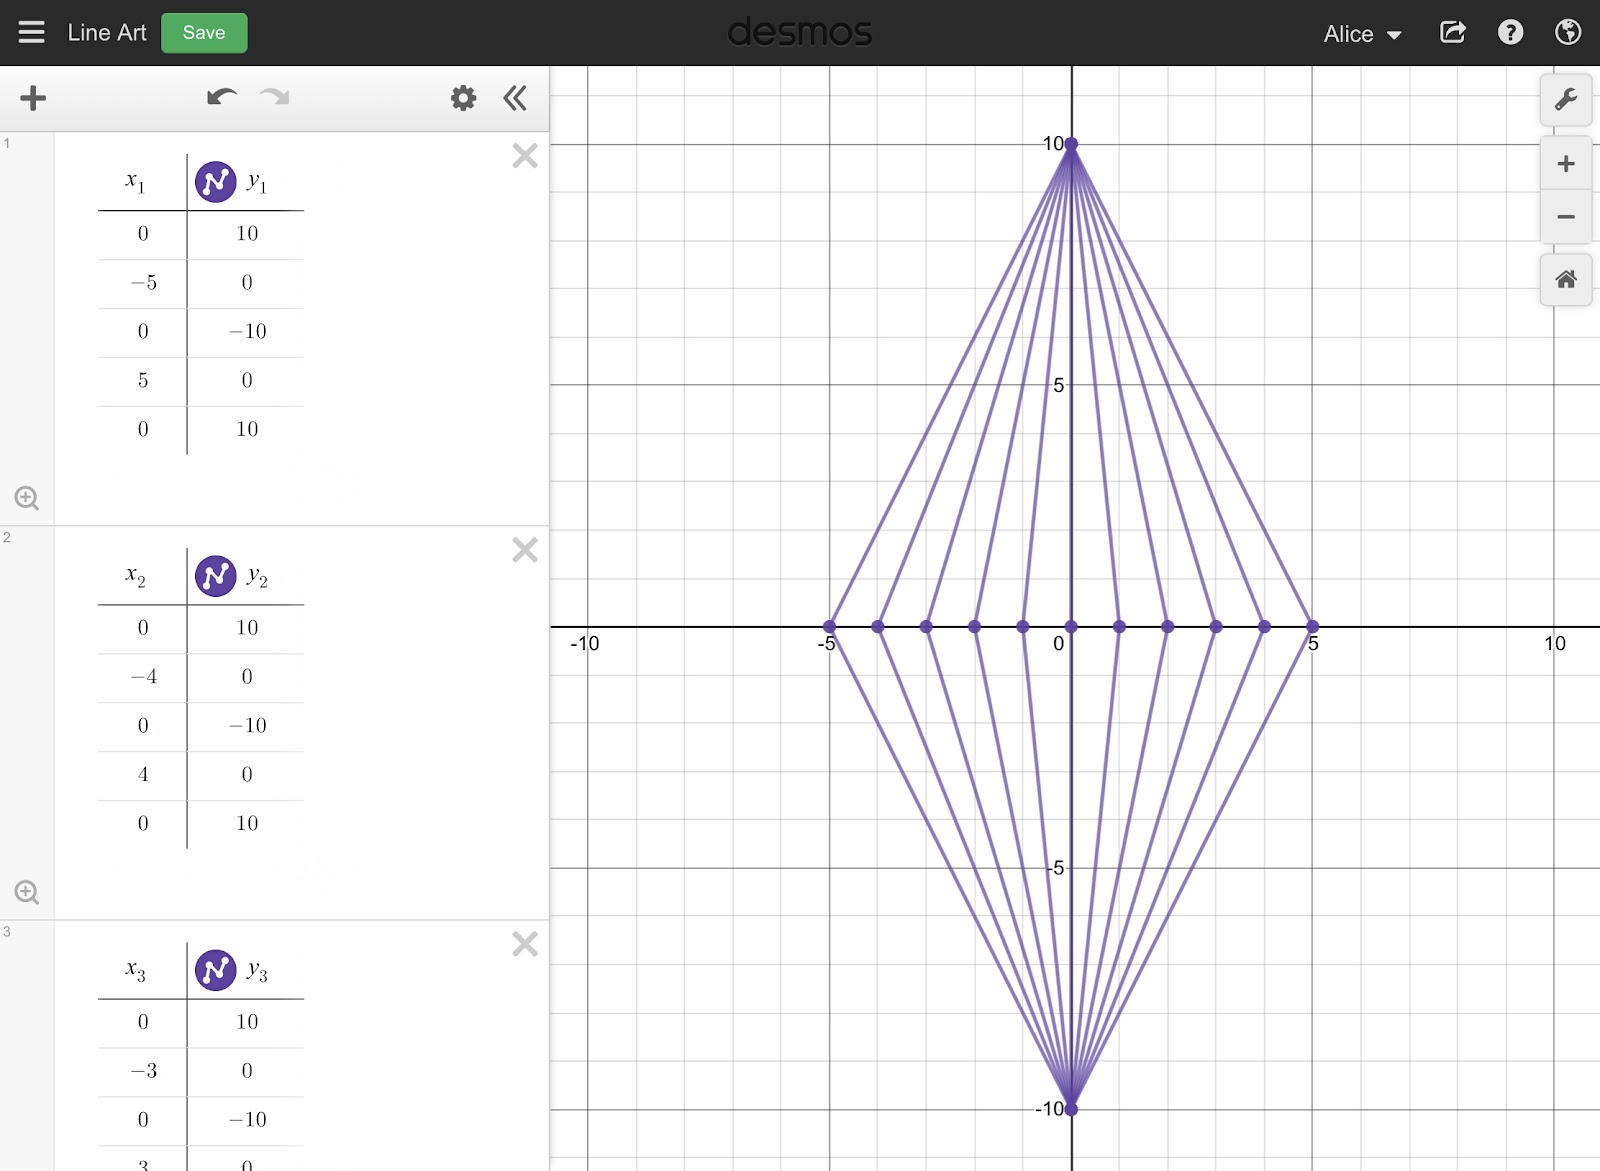
If you look closely, you will see that each “diamond” is created with a separate table of values with five points being connected with straight lines. If you are unfamiliar with using Desmos, here are some brief steps to find the table of values feature and to connect the points with lines:
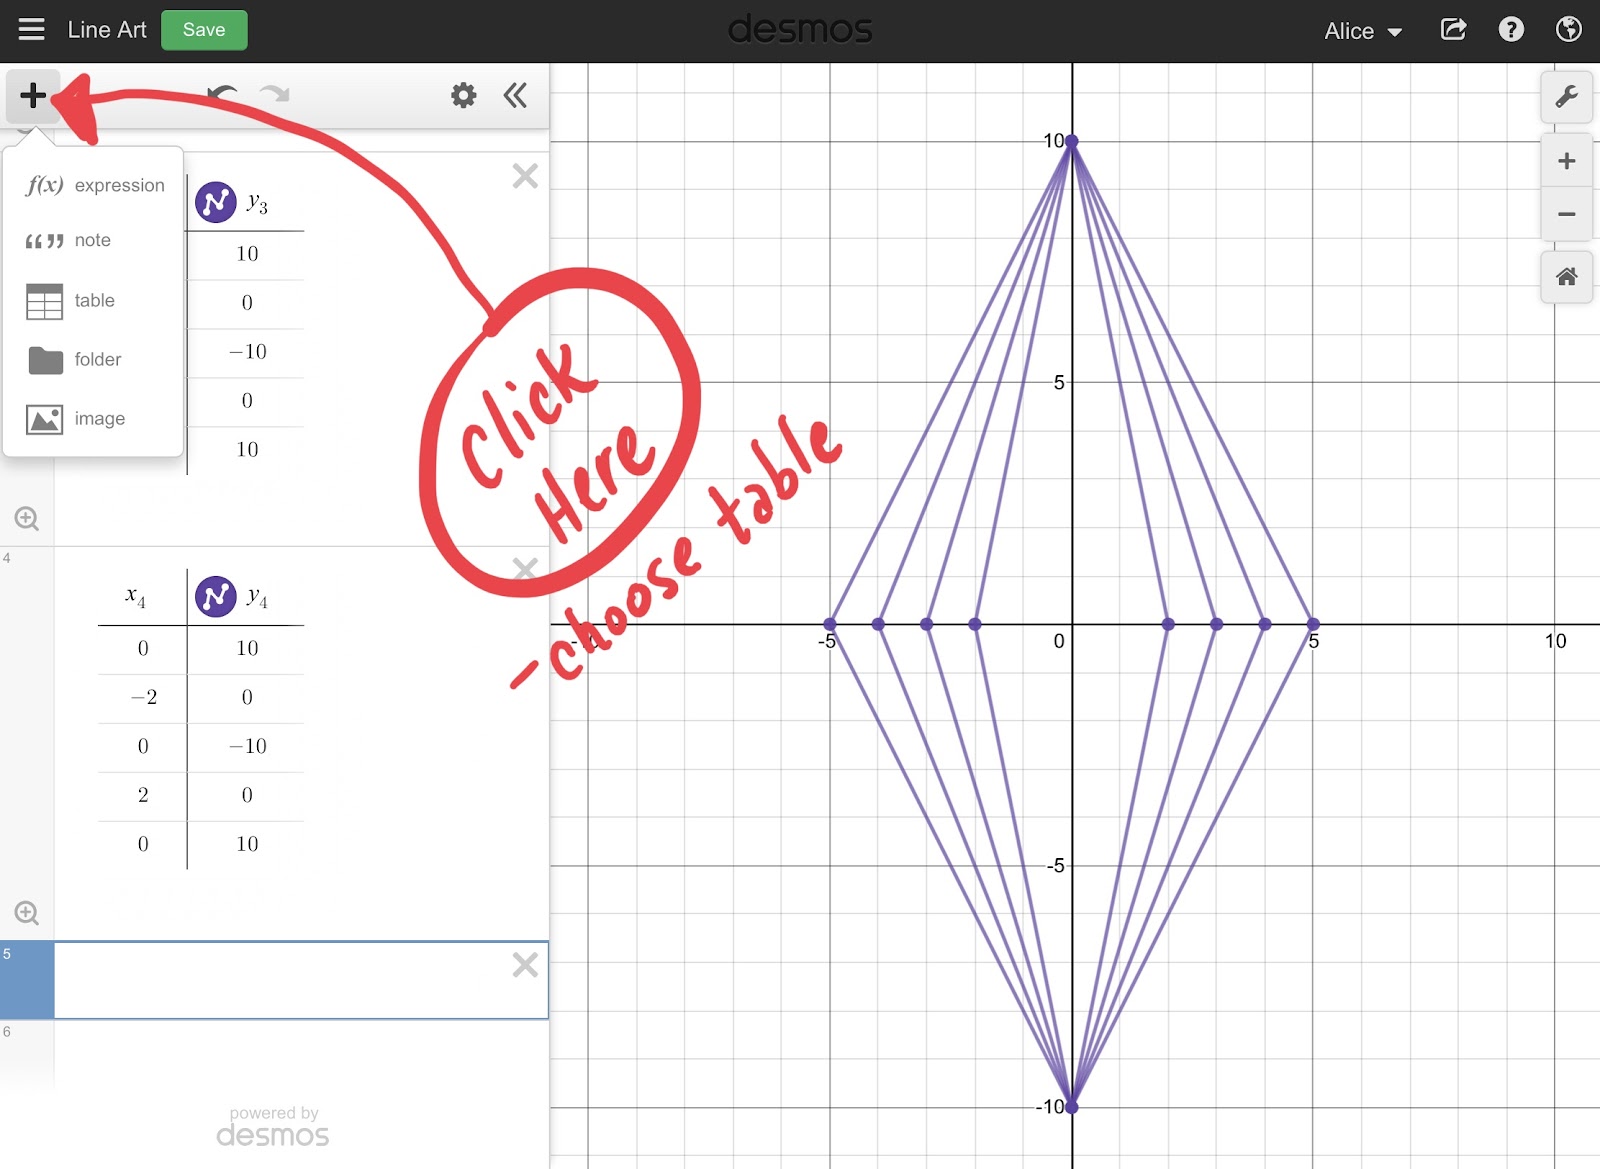
Insert a table of values using the + in the top left-hand corner of the calculator. This will insert a table into the line you are working on the left side.
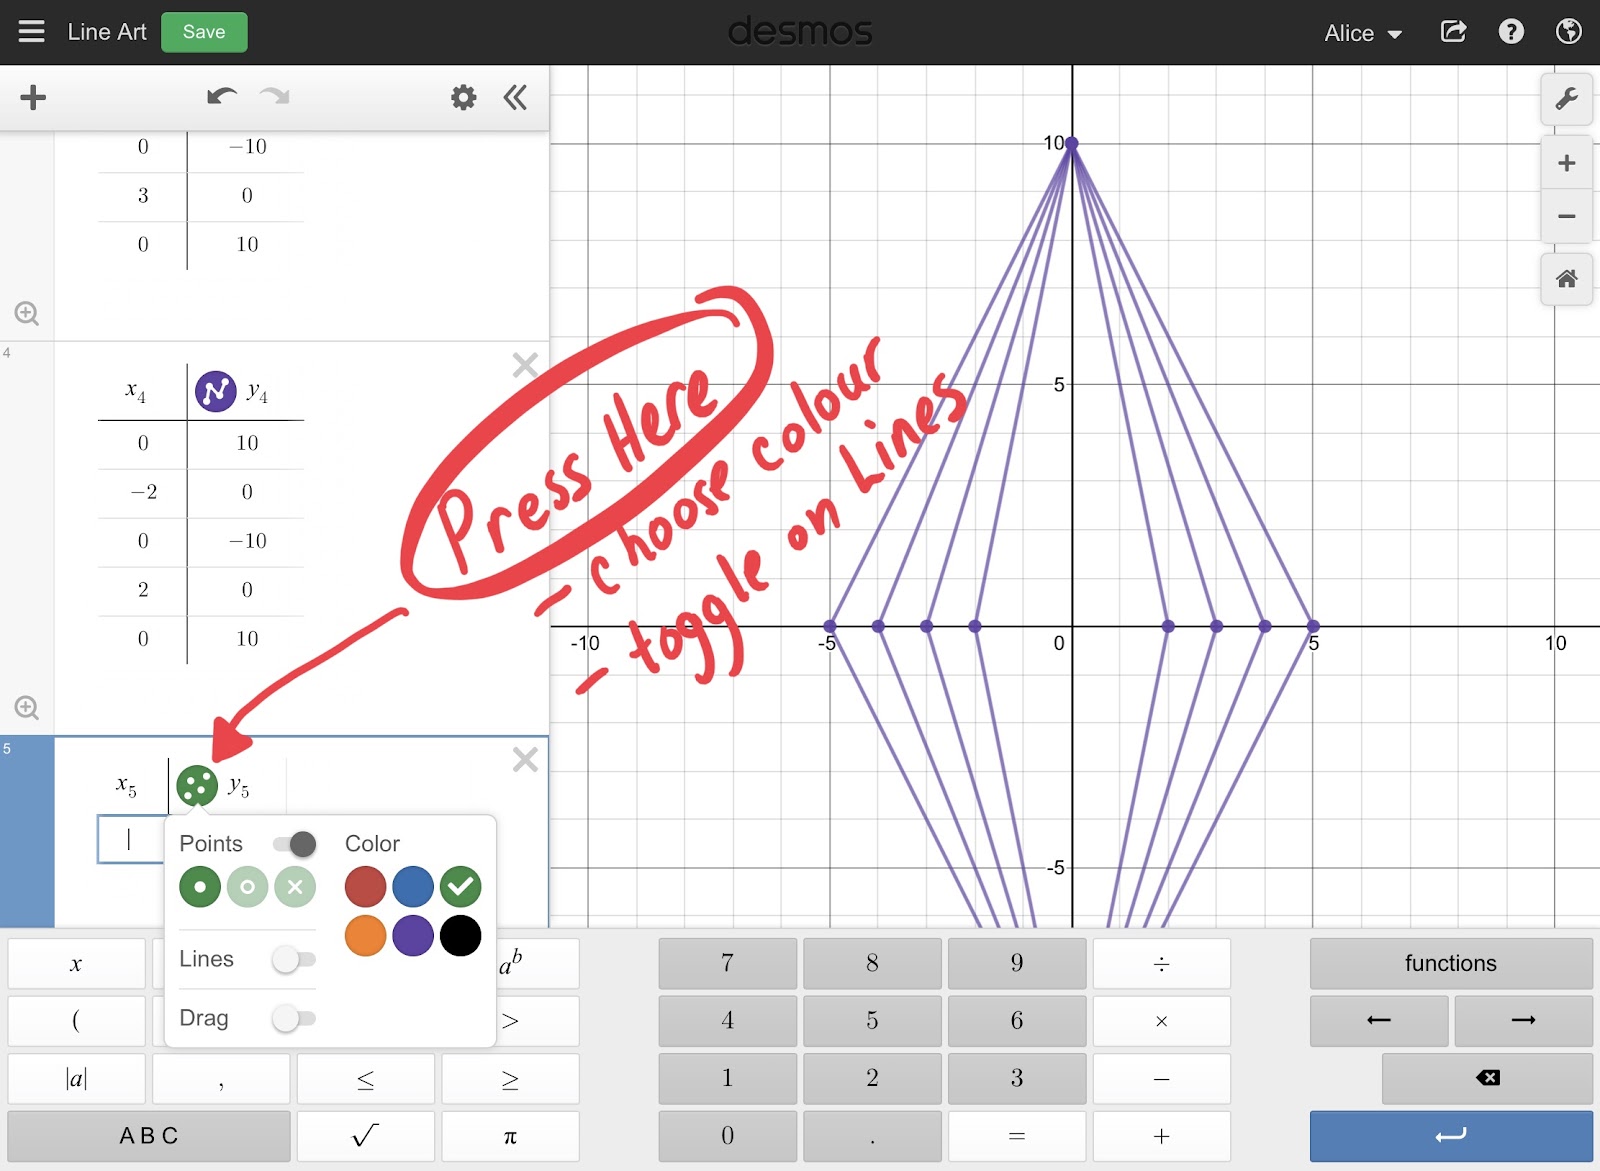
Input the points you want to plot on the graph into the table of values. You can choose to connect these points with lines by clicking (or pressing) on the coloured circle to the left of the y-column. Here you can choose the colour for your points and you can choose to toggle on the Lines option. You also have the option to make your points “moveable” by toggling on the Drag option. This will allow you the click and drag the points around, which will provide more flexibility in creating drawings in the graphing calculator.
As with most things, experimenting and playing around with the calculator will help you and your children to learn more about how it works and the functions it has available.
I hope you feel inspired to get out some graph paper and create some math art with your kids. If you try any of these ideas, please share them and I will be happy to post them.
Keep spreading the math love <3
Connect with Alice Aspinall
Twitter: @aliceaspinall, @everyonecanmath
Instagram: @everyonecanlearnmath
Facebook: @everyonecanlearnmath
YouTube: youtube.com/MrsALovesMath
Website: everyonecanlearnmath.com
Alice Aspinall, B.Math (Hon), B.Ed, is a Portuguese-Canadian secondary mathematics educator in Ontario, Canada. She is a strong advocate of the growth mindset and is continually looking for ways to build young people’s confidence in math and to make math fun, challenging, and satisfying. Alice is also a champion for females in STEM by encouraging girls to pursue science and mathematics both in high school and in post-secondary education. Alice believes everyone can learn math and she is on a mission to prove it.